


[Android] 1. consentmanager SDK Integration
Deprecated SDK / Upgrade to v3: This documentation outlines version 2.x of our SDK. The 2.x SDK is deprecated and will be removed by EOY 2025. Please upgrade to SDK version 3.x. See Help section on SDK v3 here.
On this document, you'll find general information on how to integrate our SDK to your project. For further details, please refer to our API Reference documentation. For our demo app showcasing the use cases and an implementation that could serve as a starting point, please check our repo with a Java and a Kotlin example.
Since the version 1.7.0, our SDK repository has been moved to the official Maven repository. The migration Guide can be found here. Find the compatible native SDK Versions here.
1. Installation
The consentmanager SDK for Android apps implements and provides functionality to inform the user about data protection and ask and collect consent from the user. It enables app-developers to easily integrate the consentmanager service into their app.
Steps - High Level
-
-
Integration and Configuration:
- Integrate the SDK into your app.
- Configure the SDK settings according to your needs.
-
Creating an Instance:
- On app startup, create an instance of the
CMPConsentToolclass. This instance will handle the consent process.
- On app startup, create an instance of the
-
SDK Initialization:
- Once the instance is ready, the SDK automatically retrieves necessary information from the consentmanager servers to prepare for its operation.
-
Displaying the Consent Screen:
- The SDK will automatically display the consent screen if needed when the
CMPConsentToolinstance is created.
- The SDK will automatically display the consent screen if needed when the
-
Processing Personal Data:
- Once consents are collected, info is stored and is available for querying through different properties and methods exposed by our SDK. You'll have information about rejected or accepted consents, vendors, purposes, etc.
By following these steps, you ensure that your app is compliant with consent requirements and that user consent is properly managed and stored.
-
Consent Manager Provider SDK Sequence Diagram
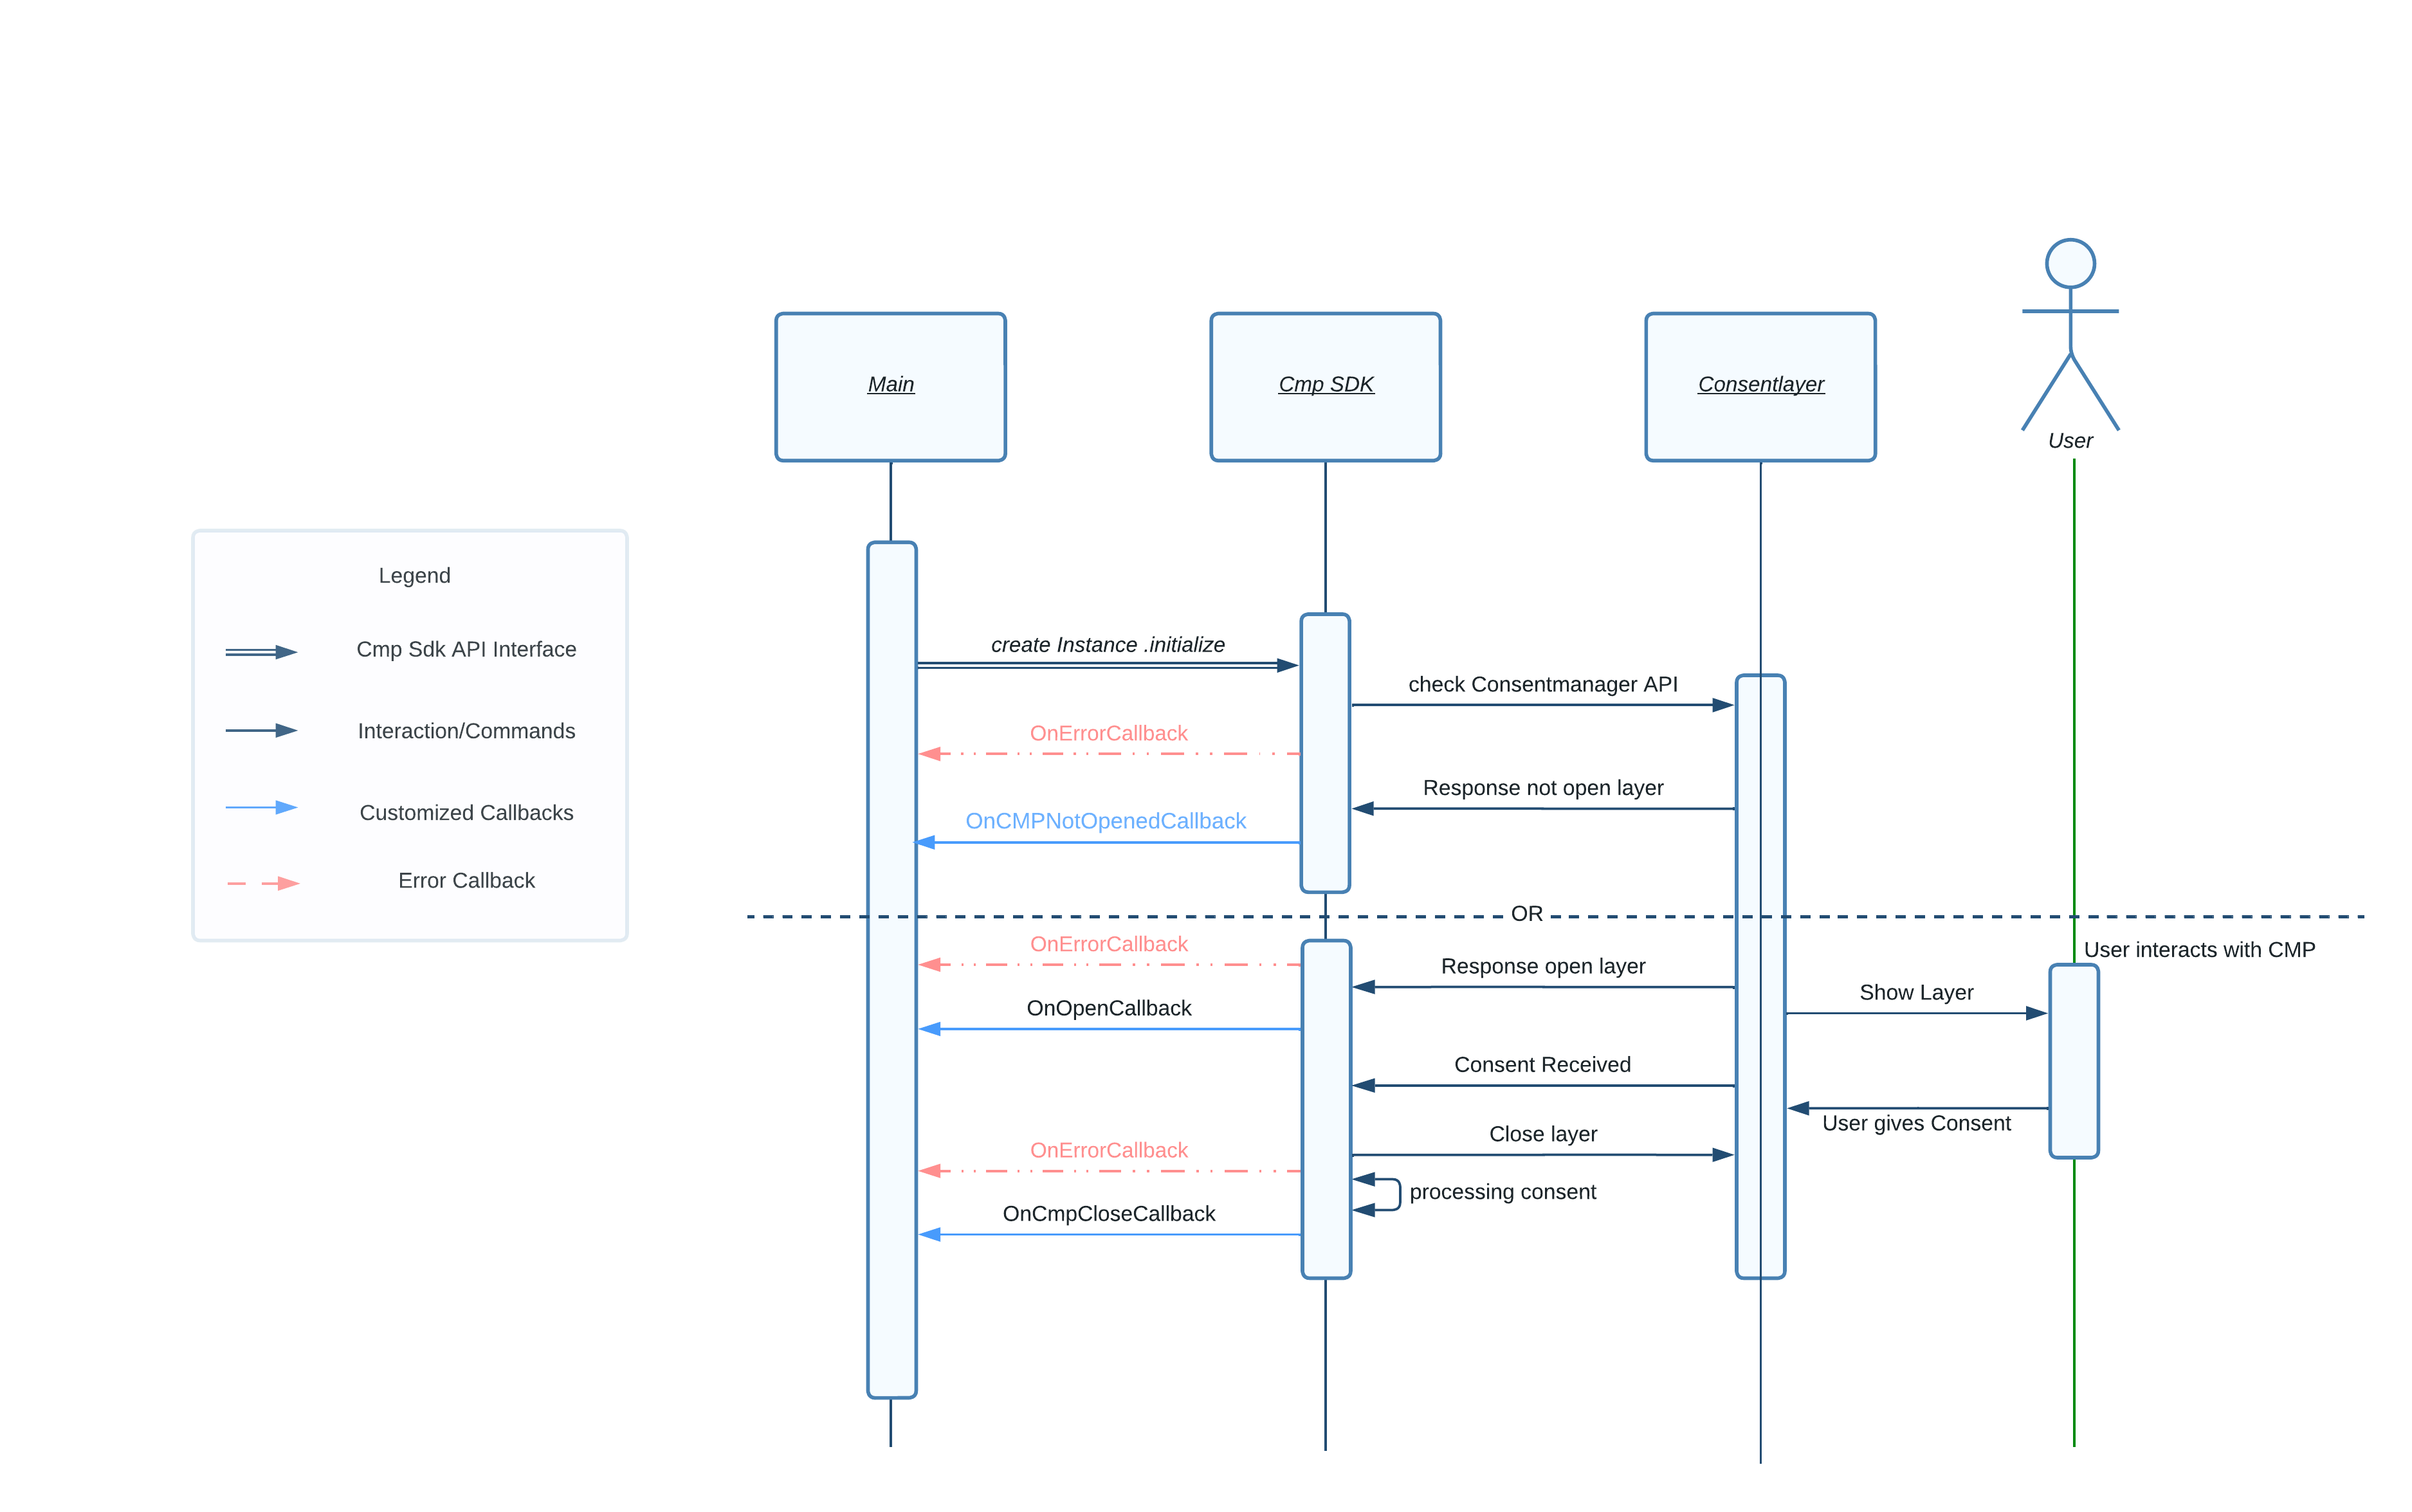
To illustrate the steps above, let's check in the diagram below three possible SDK sequence flows.
1. When creating an instance using the initialize function, there are two possible outcomes. The first is when the consentmanger API informs the SDK that the CMP will not open, which triggers the OnCmpNotOpenedCallback. The second outcome is when the consent layer opens, allowing the user to interact with it, and this triggers the OnOpenCallback. Once the user gives consent and the consent is processed, the OnCmpCloseCallback is called.
Please note that the OnErrorCallback is represented by the red dashed arrow lines to provide examples of when errors may occur during the process.
2. Creating an instance and calling the openAndCheckConsent functions will lead to a similar process. The difference is that by decoupling the creation of the instance and the check for the consentmanger API, you gain the ability to add business logic and interact with the libraries API.
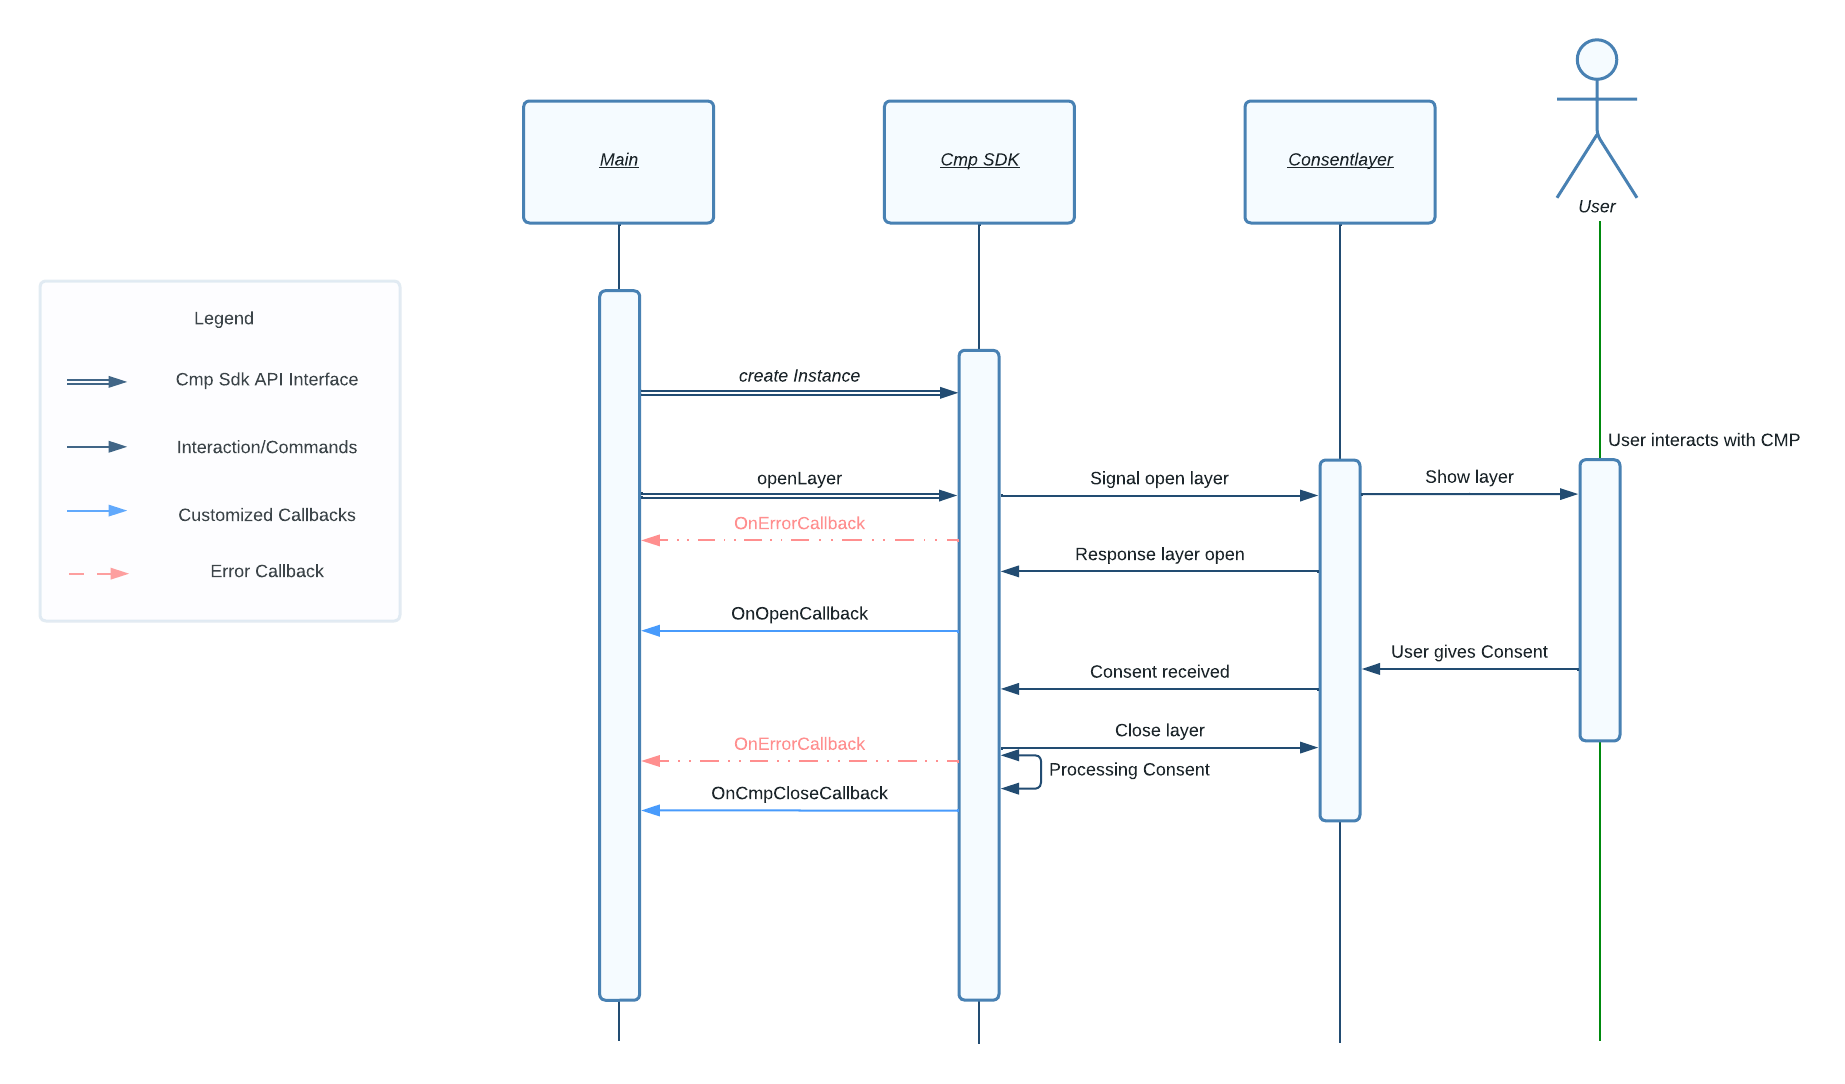
3. Creating an instance and calling the openLayer function will open the layer without checking the consentmanager, if it's necessary. If there is already given consent, the options and settings will be shown to the user. The process flow will look like this:
For further information about our SDK Version Overview & Changelog, please refer to this link.
Adding dependency via Gradle
Add the dependency to your apps build.gradle. (To always get the latest version use the + symbol to get the newest updates. You can for example always get the newest versions for minor updates through 1.x.+)
dependencies {
  implementation 'net.consentmanager.sdk:android:x.xx.x'
}
I
Adding dependency via Maven
Add the dependency to your apps build.gradle. To always get the latest version in maven you can use different methods to decline the version range. To check the available versions of the SDK, please check this link. For further information, please refer here.
<dependency>
    <groupId>net.consentmanager.sdk</groupId>
    <artifactId>android</artifactId>
    <version>x.xx.x</version>
</dependency>
2. Initializing the SDK
Permissions
This SDK requires the following permissions, please ensure to add them to your AndroidManifest.xml:
<uses-permission android:name="android.permission.ACCESS_NETWORK_STATE" />
<uses-permission android:name="android.permission.INTERNET" />
Initializing the ConsentTool - Automatically
Within the app-start (usually the regular override onCreate() function) , you must create an instance of class CMPConsentTool. The initialize() function will automatically fetch the necessary data from our server and determine if the consent screen needs to be shown or not. If so, the SDK will automatically show the consent screen at this point, collect the data and provide the data to the app. The instance can then be used in order to get consent details from the SDK in order to use it in the app.Example of initialization, using the automatic behaviour of the initialize() method:
To initialize the ConsentTool, go to your targeted class and create a instance of CMPConsentTool like shown below:
// Kotlin example of initialization of the consent layer
class CmpDemoActivity : FragmentActivity() {

    private lateinit var cmpManager: CmpManager

    override fun onCreate(savedInstanceState: Bundle?) {
        super.onCreate(savedInstanceState)

        val config = CmpConfig.apply {
            id = "<YOUR-CONSENTMANAGER-APP-ID>" // example: b238acdf1a
            domain = "<YOUR-CONSENTMANAGER-APP-DOMAIN>" // example: delivery.consentmanager.net
            appName = "<YOUR-CONSENTMANAGER-APP-NAME>" // example: testApp
            language = "<YOUR-CONSENTMANAGER-APP-LANGUAGE>" // example: DE
        }

        cmpManager = CmpManager.createInstance(this, config)
        cmpManager.initialize(this)
    }
}
// Java example of initialization of the consent layer
public class CmpDemoActivity extends AppCompatActivity {

    private CmpManager cmpManager;

    @Override
    protected void onCreate(@Nullable Bundle savedInstanceState) {
        super.onCreate(savedInstanceState);

        CmpConfig cmpConfig = CmpConfig.INSTANCE;
        cmpConfig.setId("<YOUR-CONSENTMANAGER-APP-ID>"); // example: a000aaaa1a
        cmpConfig.setDomain("<YOUR-CONSENTMANAGER-APP-DOMAIN>"); // example: delivery.consentmanager.net
        cmpConfig.setAppName("<YOUR-CONSENTMANAGER-APP-NAME>"); // example: testApp
        cmpConfig.setLanguage("<YOUR-CONSENTMANAGER-APP-LANGUAGE>"); // example: EN
        cmpConfig.setTimeout(4000);

        cmpManager = CmpManager.createInstance(this, cmpConfig);
        cmpManager.initialize(this)
    }
}
In order to create the instance of CMPConsentTool you need to configure the instance. You will need to provide the CODE-ID, server domain , an app name and a language. The CODE-ID and server domain can be found in your consentmanager account under Menu > Get Code. The app name can be used in order to distinguis different apps in the consentmanager reporting. For the language you can either use an empty string ("") for auto-detection or a 2-letter language code ("EN", "DE", "FR" and so on).
Initializing the ConsentTool - Manually
The SDK offers, for the sake of flexibility, a way to manually display the consent layer, although with the cost of two page views. Example:
// code snippet to manually check the need for consent and manually display the consent layer
// ***********************************************************************
// * ATTENTION: although some users might prefer this                    *
// *            Use Case below instead of the automatic way, it          *
// *            comes with a cost of one page view for the check()       *
// *.           method, and another pageview for the openConsentLayer(), *
// *            so be aware. 											 *
// ***********************************************************************

cmpManager.check({ isConsentRequired ->
  if (isConsentRequired) {
    // Consent is required, handle accordingly
    runOnUiThread {
      // Update UI or show consent dialog
      cmpManager.openConsentLayer()
      }
  } else {
    // Consent is not required, proceed with application logic
  }
}, isCached = true)
Creating a custom layout
For creating a custom layout you can use the CmpUIConfig class with different styling options. This class offers also some preset layouts like
- configureHalfScreenBottom
- configureHalfScreenTop
- configureCenterScreen
- configureSmallCenterScreen
- configureLargeTopScreen
- configureLargeBottomScreen
For creating a custom layout the CMP SDK offers also different strategies:
- Dialog Window
- Popup Window
- Fragment
You can change the strategy by setting the UIConfig parameter:
CmpUIConfig.uiStrategy = CmpUIStrategy.DIALOG
CmpUIConfig.uiStrategy = CmpUIStrategy.POPUP
CmpUIConfig.uiStrategy = CmpUIStrategy.ACTIVITY
CmpUIConfig.uiStrategy = CmpUIStrategy.FRAGMENT
We recommend to use a Popup Window which is also set as default since version 2.3.0
Two important parameters will determine the Popup and Dialog behaviour. In the table below, you can check the relation between the parameters isFocusable and isOutsideTouchable:
Popup behaviour
| Parameter | isFocusable = true |
isFocusable = false |
isOutsideTouchable = true |
Dismisses on outside touch. Can gain focus for input events. | Dismisses on outside touch. Does not gain focus or intercept keyboard input. |
isOutsideTouchable = false |
Does not dismiss on outside touch. Can gain focus and intercept input events. | Does not dismiss on outside touch. Does not gain focus or intercept keyboard input. |
Dialog behaviour
| Parameter | isFocusable = true |
isFocusable = false |
isOutsideTouchable = true |
Dismisses on outside touch (setCanceledOnTouchOutside(true)). Dialog is focusable by default. |
Dialog does not dismiss on outside touch and might not behave as expected since dialogs are typically focusable. |
isOutsideTouchable = false |
Does not dismiss on outside touch (setCanceledOnTouchOutside(false)). Dialog remains focusable and can intercept input events. |
Dialog does not dismiss on outside touch and might not behave as expected due to the lack of focusability. |
Using the Fragment strategy
R.id.cmpContainer is a Framelayout which could look like this in the activity layout xml in layout/{your_activity}.xml<FrameLayout
android:id="@+id/cmpContainer"
android:layout_width="match_parent"
android:layout_height="400dp"
android:translationZ="90dp"
app:layout_constraintTop_toTopOf="parent" />3. Using the SDK
Checking for consent
In order to check whether a vendor or purpose have consent, you can use the two methods:
if (cmpManager.hasPurposeConsent("52")) {
    if (cmpManager.hasVendorConsent("s26")) {
        // Add your logic here
    }
}
Both methods hasPurposeConsent and hasVendorConsent have two parameters, one require and one optional:
-
id- String of the vendor or purpose ID. Please note that vendor IDs can have different formats ("123", "s123" and "c123"), please double-check with Menu > Vendors and Menu > Purposes in your consentmanager account. -
isIABVendor/isIABPurpose(Optional) - If the vendor or purpose is a vendor/purpose that follows the IAB TCF standard, you will need to set a true, otherwise a false.
Remember: All vendor that do not belong to the IAB have IDs starting with a "s" or "c" (e.g. "s123"); vendors that belong to the IAB have IDs not starting with a "s" or "c".
Re-Opening the Consent Screen
In order to allow the user to change the choices, you can simply call openConsentLayer():
cmpManager?.openConsentLayer(context)Passing Consent information to other sources
In some cases a native app might contain webviews in order to display certain things like advertising oder content. In order to transmit the consent information from the SDK to the webview, please use the function:
String consentData = cmpConsentTool?.exportCmpString();This will export the consent information and all further data that is needed by the CMP. You can then pass this information to the CMP that is in your webview by adding it to the URL that is called in the webview:
myWebView.loadURL("https://mywebsite.com/....#cmpimport=" + consentData);Custom Event Listeners
To add additional process logic you can make use of Event Listeners. Following Event Listeners are available:
| Name |
Occurrs
|
| OnOpenCallback |
Listener for Event when CMP opened |
| OnCMPCloseCallback |
Listener for Event when CMP is closed |
| OnCMPNotOpenedCallback |
Listener for Event when CMP doesn't need to be opened |
|
OnErrorCallback |
Listener for Event when there is an error in the consent management process. |
| OnButtonClickedCallback |
Listener for ButtonEvent |
Import/Export Consent
To import or export the consent you can use the functions exportCMPData() and importCMPData(). Check the example below:
// Importing consent data if desired
cmpManager.importCmpString("your_base64_encoded_consentString")

// ... Your code here ...

// Exporting consent data
val consentString: String = cmpManager.exportCmpString()
The consentString you need to pass should be base64 encoded.
Internal App links and domain whitelist
To implement the functionality where certain domains are whitelisted and, when accessed within the consent platform (CMP) WebView, are not opened in an external browser like Chrome but within the WebView itself, you can implement a callback mechanism to perform custom actions based on the domain, such as opening an Android activity.
// apply the domains to be whitelisted
CmpConfig.apply {
            id = cmpId
            domain = cmpDomain
            appName = cmpAppName
            language = cmpLanguage
            domainWhitelist = cmpDomainWhitelist
        }


// implement the callback: CmpOnClickLinkCallback
    override fun onClickLink(url: String): Boolean {
        Log.d("CMP", url)
        // Business logic
        return true // return handleWebViewInteraction boolean
    }
Logging
When using our Android SDK, you may need to debug or analyze log information for various purposes. The logs generated by our SDK are tagged with "CMP", which allows you to easily filter and view only the relevant logs. This guide provides step-by-step instructions on how to access these logs using Logcat in Android Studio.
Search for the Tag: In the search bar above the log statements, type CMP to filter out the logs tagged with "CMP".
Optional: Enable Debug Mode
In CMPConfig, set isDebugMode = true.
val config = CmpConfig.apply {
    // ... other settings
    isDebugMode = true
}
- Enables more detailed logs tagged with "CMP".
- Useful for debugging and analysis.
Troubleshooting
Class Not Found or NoSuchMethodException:
ProGuard can sometimes obfuscate class names or remove methods that are dynamically referenced via reflection. To fix this, you need to specify the classes and methods that should be kept intact in the ProGuard configuration file using the -keep directive.
Example ProGuard configuration to keep a specific class and its methods:
# Kotlin serialization looks up the generated serializer classes through a function on companion
# objects. The companions are looked up reflectively so we need to explicitly keep these functions.
-keepclasseswithmembers class **.*$Companion {
    kotlinx.serialization.KSerializer serializer(...);
}
# If a companion has the serializer function, keep the companion field on the original type so that
# the reflective lookup succeeds.
-if class **.*$Companion {
  kotlinx.serialization.KSerializer serializer(...);
}
-keepclassmembers class <1>.<2> {
  <1>.<2>$Companion Companion;
}

# If your project uses WebView with JS, uncomment the following
# and specify the fully qualified class name to the JavaScript interface
# class:
-keepclassmembers class * {
    @android.webkit.JavascriptInterface <methods>;
}

-keepattributes JavascriptInterface

-keepclassmembers class net.consentmanager.sdk.common.callbacks.* {
   public *;
}

-keepclassmembers class net.consentmanager.sdk.consentlayer.ui.consentLayer.CmpWebView {
   public *;
}

-keepclassmembers class net.consentmanager.sdk.consentlayer.ui.CmpLayerAppInterface {
   public *;
}
-keep class net.consentmanager.sdk.CMPConsentTool {
                                                      *;
                                                  }

-keepclassmembers class * {
    @android.webkit.JavascriptInterface <methods>;
}

-keepattributes JavascriptInterface

# Serializer for classes with named companion objects are retrieved using `getDeclaredClasses`.
# If you have any, uncomment and replace classes with those containing named companion objects.
#-keepattributes InnerClasses # Needed for `getDeclaredClasses`.
#-if @kotlinx.serialization.Serializable class
#com.example.myapplication.HasNamedCompanion, # <-- List serializable classes with named companions.
#com.example.myapplication.HasNamedCompanion2
#{
#    static **$* *;
#}
#-keepnames class <1>$$serializer { # -keepnames suffices; class is kept when serializer() is kept.
#    static <1>$$serializer INSTANCE;
#}
