


[iOS] 1. consentmanager SDK Integration
Deprecated SDK / Upgrade to v3: This documentation outlines version 2.x of our SDK. The 2.x SDK is deprecated and will be removed by EOY 2025. Please upgrade to SDK version 3.x. See Help section on SDK v3 here.
On this document, you'll find general information on how to integrate our SDK to your project. For further details, please refer to our API Reference documentation. For our demo app showcasing the use cases and an implementation that could serve as a starting point, please check our repo.
1. Installation
The consentmanager SDK for iOS apps implements and provides functionality to inform the user about data protection and ask and collect consent from the user. It enables app-developers to easily integrate the consentmanager service into their app.
Steps - High Level Description
-
Integration and Configuration:
- Integrate the SDK into your app.
- Configure the SDK settings according to your needs.
-
Creating an Instance:
- On app startup, create an instance of the
CMPManagerclass. This instance will handle the consent process.
- On app startup, create an instance of the
-
SDK Initialization:
- Once the instance is ready, the SDK automatically retrieves necessary information from the consentmanager servers to prepare for its operation.
-
Displaying the Consent Screen:
- The SDK will automatically display the consent screen if needed when the
CMPManagerinstance is created.
- The SDK will automatically display the consent screen if needed when the
-
Processing Personal Data:
- Once consents are collected, info is stored and is available for querying through different properties and methods exposed by our SDK. You'll have information about rejected or accepted consents, vendors, purposes, etc.
By following these steps, you ensure that your app is compliant with consent requirements and that user consent is properly managed and stored.
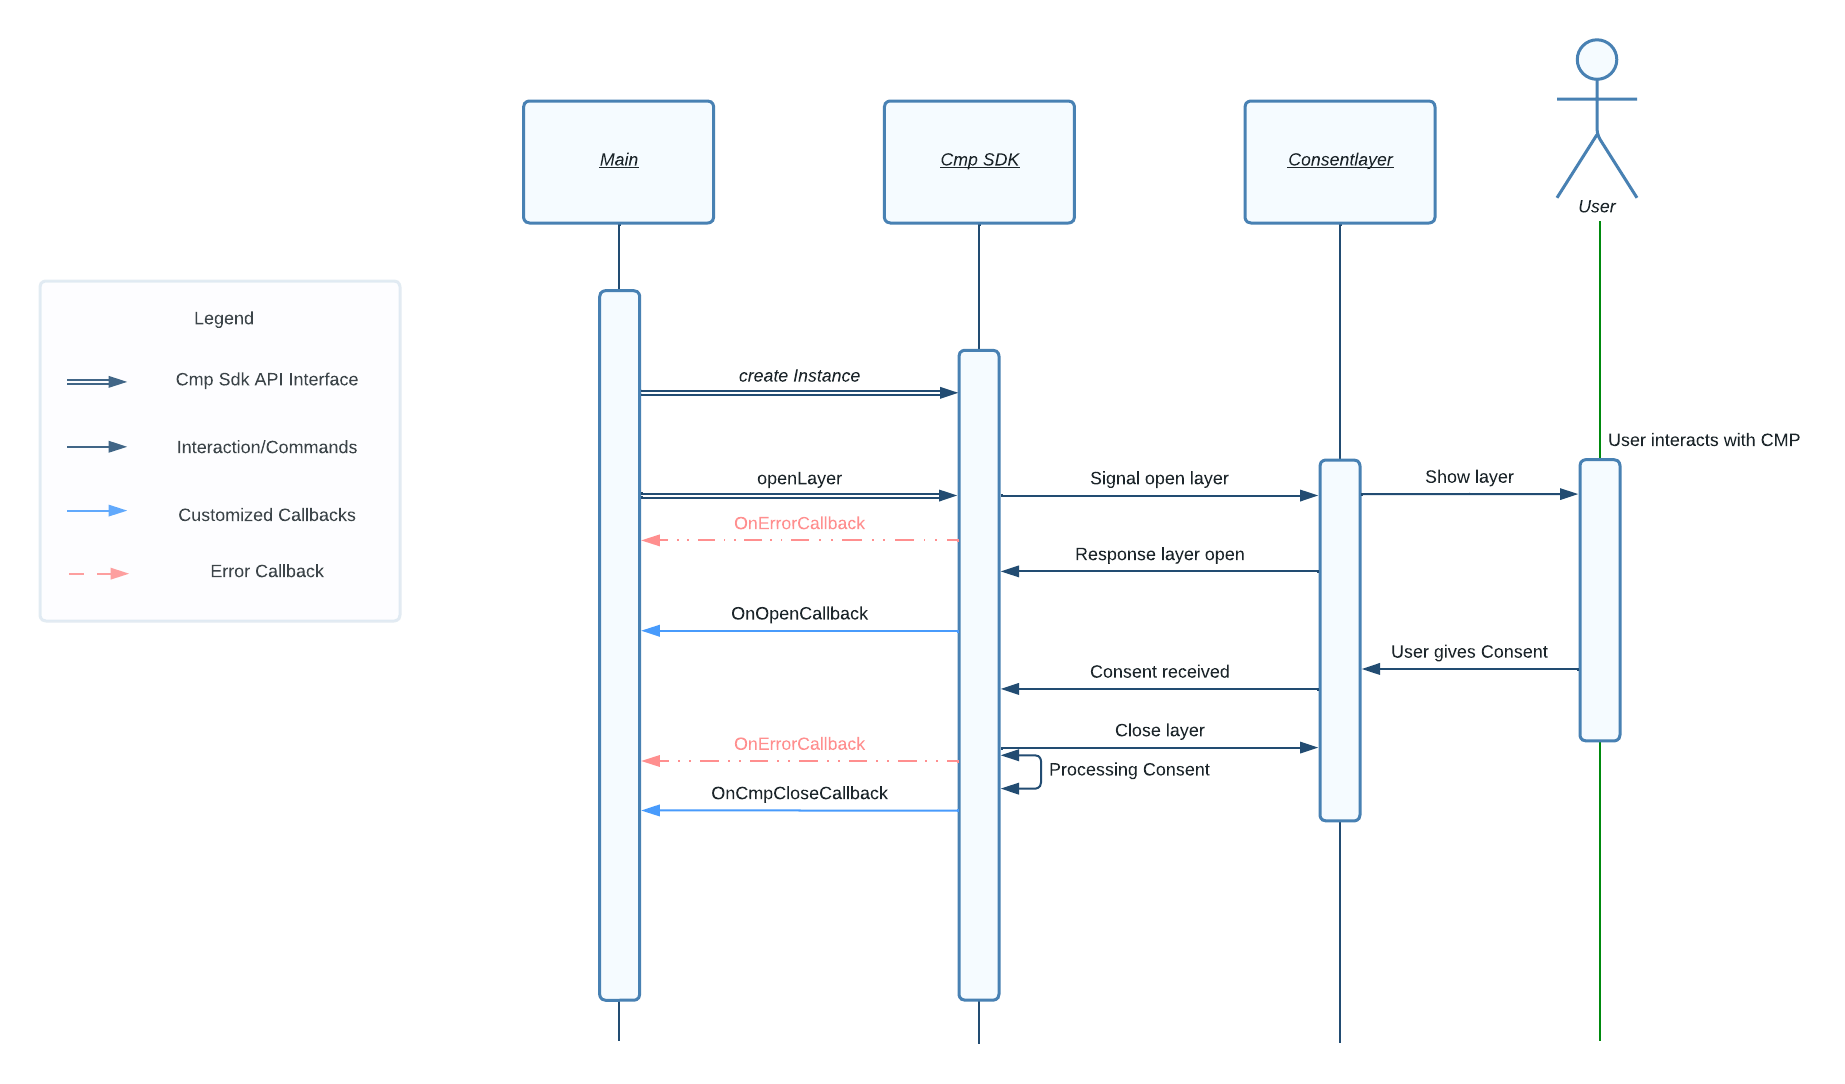
Consent Manager Provider SDK Sequence Diagram
To illustrate the steps above, let's check in the diagram below three possible SDK sequence flows.
1. When creating an instance using the initialize function, there are two possible outcomes. The first is when the consentmanger API informs the SDK that the CMP will not open, which triggers the OnCmpNotOpenedCallback. The second outcome is when the consent layer opens, allowing the user to interact with it, and this triggers the OnOpenCallback. Once the user gives consent and the consent is processed, the OnCmpCloseCallback is called.
Please note that the OnErrorCallback is represented by the red dashed arrow lines to provide examples of when errors may occur during the process.
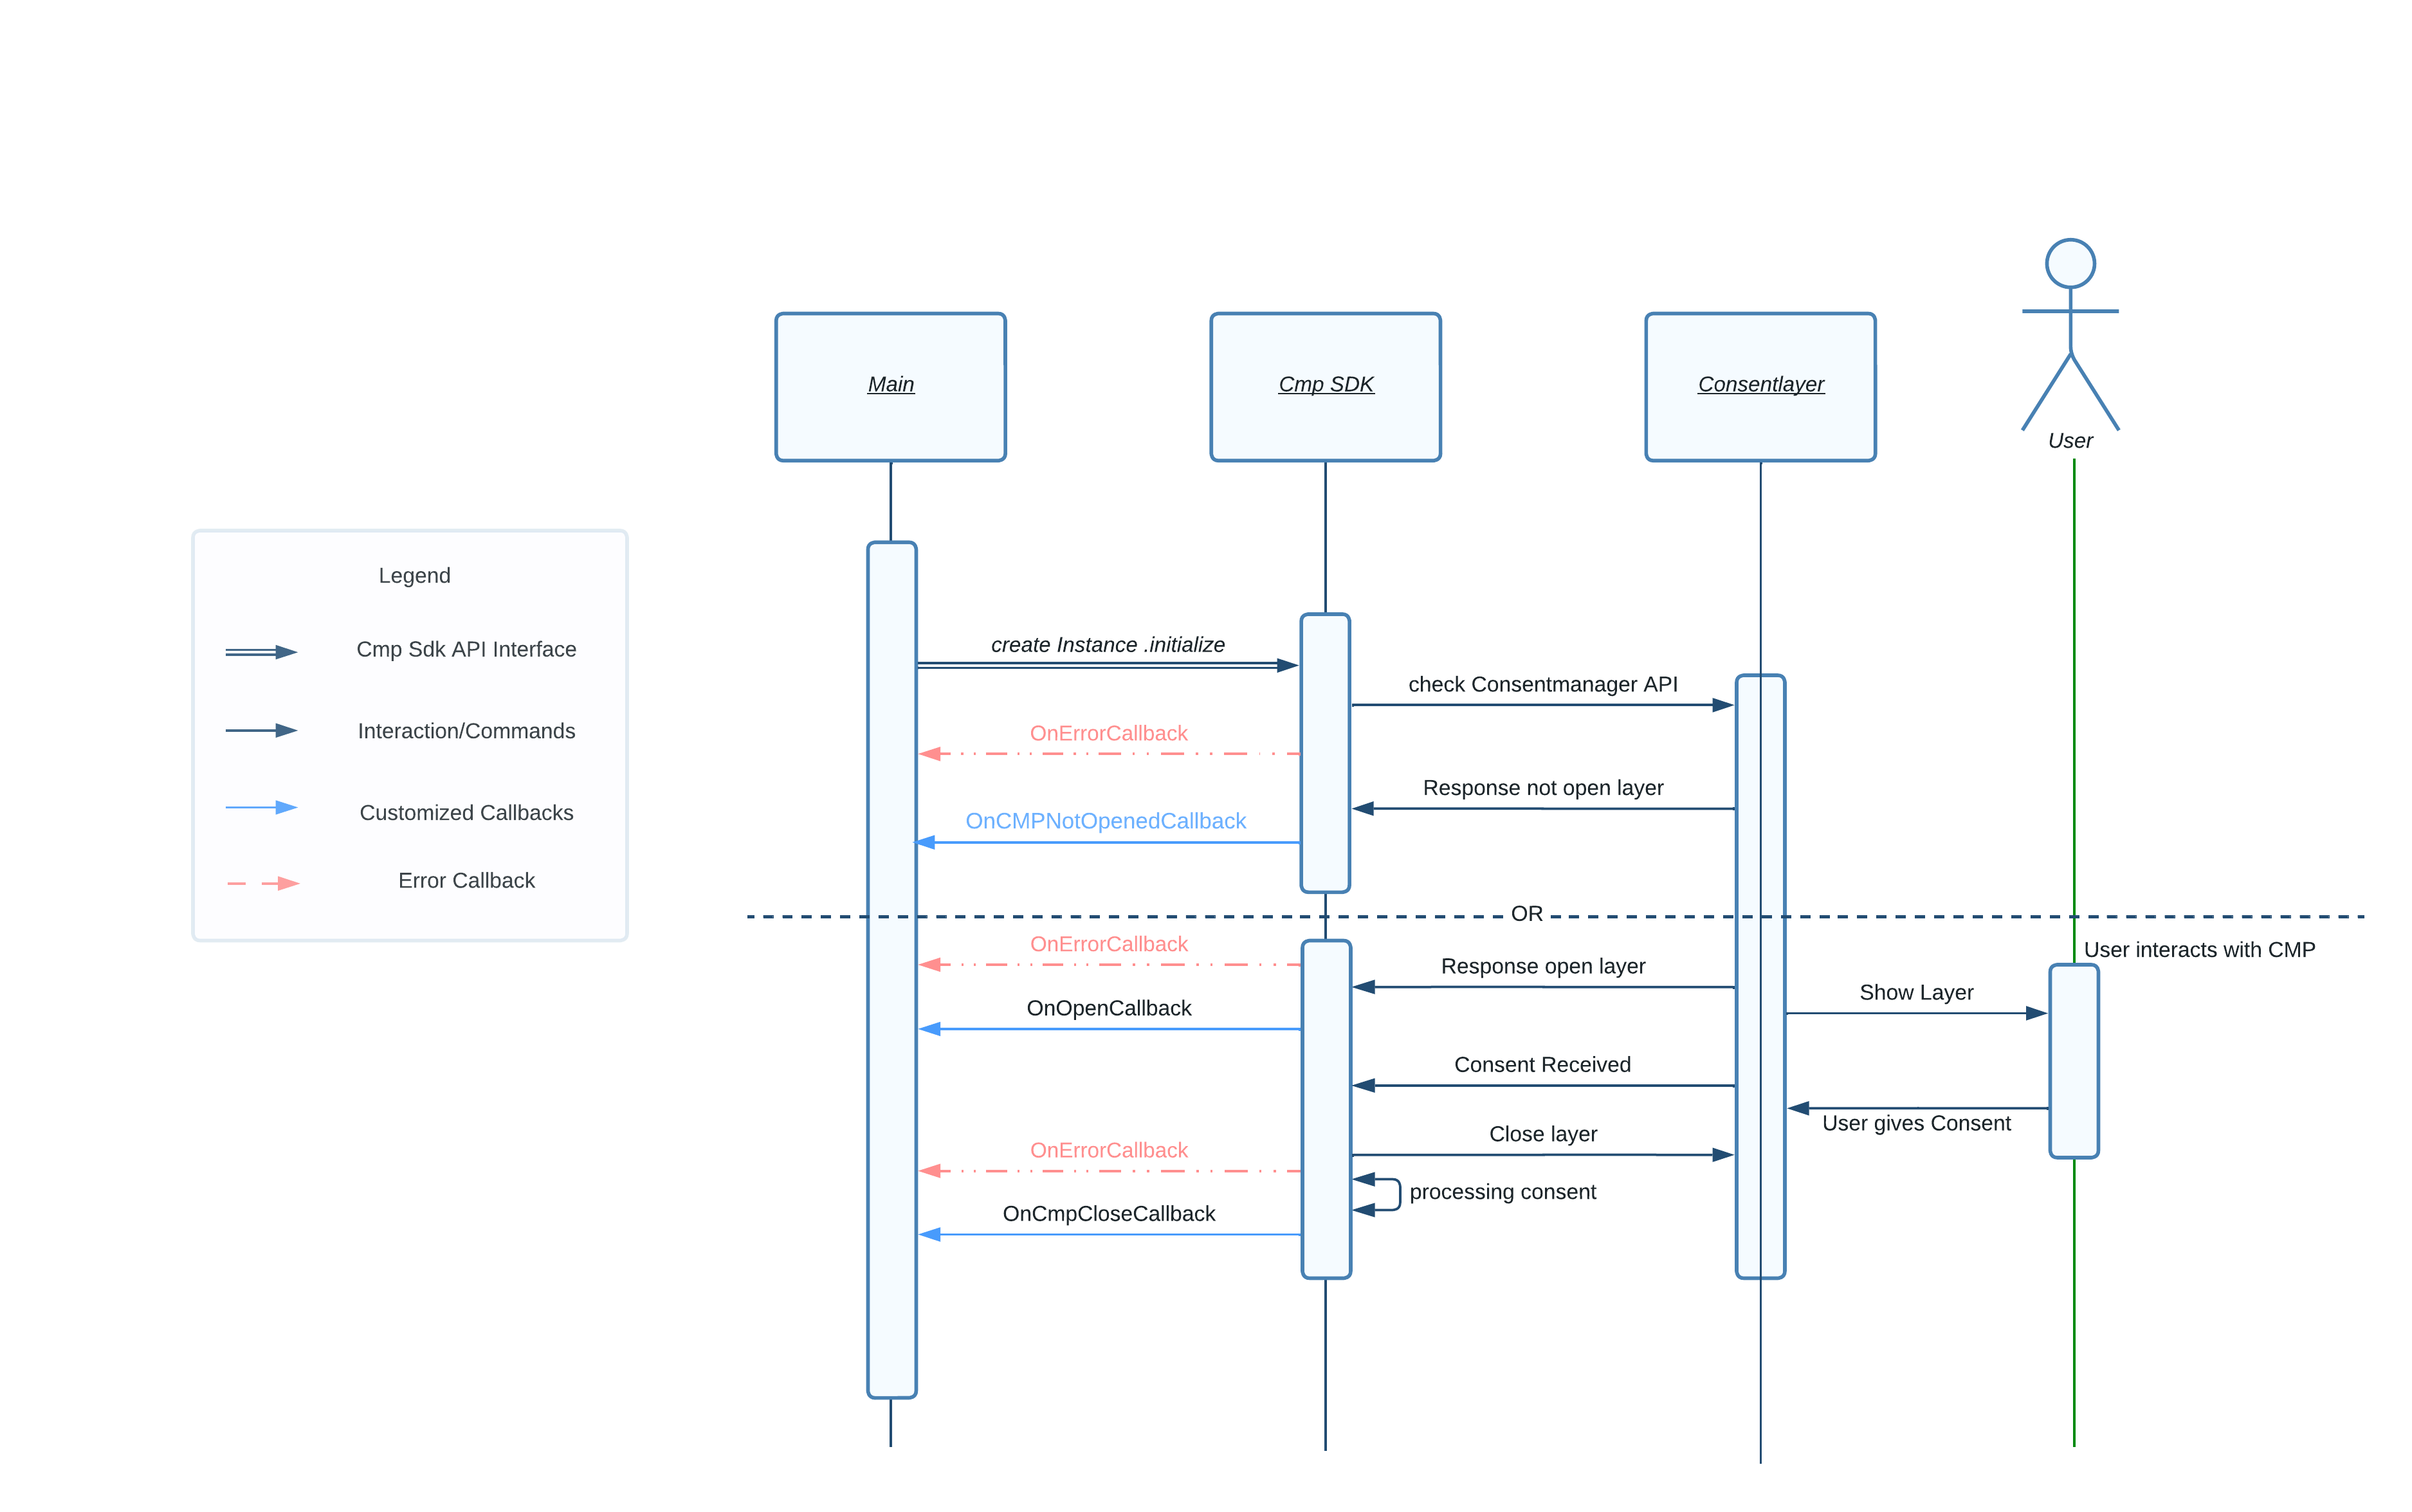
2. Creating an instance and calling the openAndCheckConsent functions will lead to a similar process. The difference is that by decoupling the creation of the instance and the check for the consentmanger API, you gain the ability to add business logic and interact with the libraries API.
3. Creating an instance and calling the openLayer function will open the layer without checking the consentmanager, if it's necessary. If there is already given consent, the options and settings will be shown to the user. The process flow will look like this:
For further information about our SDK Version Overview & Changelog, please refer to this link.
Installation via Cocoapod
You can install the consentmanager SDK by adding CmpSdk to your Podfile as explained in the example below:
target 'YourProject' do
  # Comment the next line if you don't want to use dynamic frameworks
  use_frameworks!
  pod 'CmpSdk'

  target 'YourProjectTests' do
    inherit! :search_paths
     # Pods for testing
  end

...

end
Once this is done, you need to run pod install in your project directory to install the consentmanager SDK. After this, please open the *.xcworkspace and build.
After you have followed all the steps, your dependency should be installed, and you can proceed and use it in your project.
Installation via Swift Package Manager
- Open Swift Package Manager.
- Go to
File>Swift Packages>Add Package Dependency. - Add the SDK Repository URL
You'll now see a new window where you can enter the URL of the SDK's repository.Most SDKs are hosted on GitHub, so the URL will often look like
https://github.com/iubenda/cm-sdk-xcframework.git
After entering the URL, clickNext. - Select the SDK Version
SPM will now fetch the repository and ask you to select a version.
You can choose to add the package by selecting a version rule:
-Up to Next Major: This will update the package up to the next major version. It is the recommended option as it adds updates which do not have breaking changes.
-Up to Next Minor: This will update the package up to the next minor version.
-Exact: This will lock the package to a specific version. No updates will be installed.
Select the version you wish to use and clickNext. - Add the SDK to your Target
On the next screen, select the targets that you want to add the package dependency to. Targets are usually your app and any tests that you might have. ClickFinishto complete the process. - Import the SDK
Now that the SDK has been added to your project, you need to import it to use it.Go to the file where you want to use the SDK and add the following import statement at the top:
import CmpSdk2. Initializing the SDK
Within the app-start (your viewDidLoad function), you must create an instance of class CMPManager. The initialize() function will automatically fetch the necessary data from our server and determine if the consent screen needs to be shown or not. If so, the SDK will automatically show the consent screen at this point, collect the data and provide the data to the app. The instance can then be used in order to get consent details from the SDK in order to use it in the app.
Example of initialization, using the automatic behaviour of the initialize() method:
class ViewController: UIViewController {

  // Usual implementation of a View Controller

  var cmpManager: CmpManager? = nil

  override func viewDidLoad() {

      super.viewDidLoad()

      // Configure your CMP
      let cmpConfig: CmpConfig = CmpConfig.shared.setup(
                                          withId: "<YOUR-CONSENTMANAGER-APP-ID>", // example: a000aaaaa1a
                                          domain: "<YOUR-CONSENTMANAGER-APP-DOMAIN>", // example: delivery.consentmanager.net
                                          appName: "<YOUR-CONSENTMANAGER-APP-NAME>", // example: testApp
                                          language: "<YOUR-CONSENTMANAGER-APP-LANGUAGE"); // example: DE

      // You can also determine log levels or ask for Apple's App Tracking Transparency, for example
      cmpConfig.logLevel = CmpLogLevel.verbose;
      cmpConfig.isAutomaticATTRequest = true;

      // Then you pass the cmpConfig to set up and initialize the instance of our SDK
      cmpManager = CmpManager(cmpConfig: cmpConfig)
              .withErrorListener(onCMPError)
              .withCloseListener(onClose)
              .withOpenListener(onOpen)
              .withOnCMPNotOpenedListener(onCMPNotOpened)
              .withOnCmpButtonClickedCallback(onButtonClickedEvent)
              .initialize()  // This method will trigger the webview loading to collect consent, if necessary
  }
}
The SDK offers, for the sake of flexibility, a way to manually display the consent layer, although at the cost of two page views, one for the check method, another for the openLayer method. Example:
// code snippet to manually check the need for consent and manually display the consent layer
// ***********************************************************************
// * ATTENTION: although some users might prefer this                    *
// *            Use Case below instead of the automatic way, it          *
// *            comes with a cost of one page view for the check()       *
// *.           method, and another pageview for the openLayer method()  *
// *            so be aware. 											 *
// ***********************************************************************

cmpManager.check(isCached: true) { isConsentRequired in // One page view is counted in case cached consent is expired
    if isConsentRequired {
        // Consent is required, handle accordingly
        DispatchQueue.main.async {
            // Update UI or show consent dialog
            cmpManager?.openLayer()                      // One page view is counted here
        }
    } else {
        // Consent is not required, proceed with application logic
    }
}
Please note that it is vital to use the initialize() method in the SDK in the viewDidLoad Method, if you decide for the automatic initialization. Otherwise the view may not be ready to use and the SDK may fail. Also, please ensure you are using the correct configuration data. The configuration data can be found in your consentmanager account at Menu > CMPs > Get Code for Apps > Code-ID
SwiftUI
To integrate the SDK in a SwiftUI environment, you must provide a UIViewController which is wrapped inside a UIViewControllerRepresentable. You can find more information about on the official apple documentation. Before integrating the SDK make sure you already integrated the Module in your project.
1. We start with creating a usual UiViewController similar to the examples for Swift/Objective C
import UIKit
import CmpSdk

class CmpViewController: UIViewController {

    var cmpManager: CmpManager? = nil

    override func viewDidLoad() {
      .
      .
      .
      // Implement it like the previous example
    }

    /**
     * Show consent button was clicked
     */
    @objc func onShowConsentClicked(sender: UIButton!) {
        cmpManager!.openView()
    }
}
2. In order to use the controller in the swiftUI you have to create a UIViewControllerRepresentable which is instantiating the CmpViewController:
import SwiftUI

struct CmpViewControllerRepresentable: UIViewControllerRepresentable {
    func makeUIViewController(context: Context) -> UIViewController {
        let cmpViewController = CmpViewController()

        return cmpViewController
    }

    func updateUIViewController(_ uiViewController: UIViewController, context: Context) {
    }
}
3. Now we can use the ControllerView inside the SwiftUI context :
import SwiftUI

@main
struct cmpApp: App {
    var body: some Scene {
        WindowGroup {
            CmpViewControllerRepresentable()
        }
    }
}
3. Using the SDK
Checking for consent
In order to check whether a vendor or purpose have consent, you can use the two methods:
if cmpManager!.hasPurposeConsent("52")
{
    if cmpManager!.hasVendorConsent("s26")
    {
        //Add your logic here
    }
}
Both methods hasPurposeConsent and hasVendorConsent require two parameters:
- id - String of the vendor or purpose ID. Please note that vendor IDs can have different formats ("123", "s123" and "c123"), please double-check with Menu > Vendors and Menu > Purposes in your consentmanager account.
- isIABVendor / isIABPurpose - If the vendor or purpose is a vendor/purpose that follows the IAB TCF standard, you will need to set a true, otherwise a false.
Remember: All vendor that do not belong to the IAB have IDs starting with a "s" or "c" (e.g. "s123"); vendors that belong to the IAB have IDs not starting with a "s" or "c".
Re-Opening the Consent Screen
In order to allow the user to change the choices, you can simply call openView()
cmpManager!.openView()Passing Consent information to other sources
In some cases an native app might contain webviews in order to display certain things like advertising or content. In order to transmit the consent information from the SDK to the webview, please use the function:
consentData = cmpManager.exportCmpString();This will export the consent information and all further data that is needed by the CMP. You can then pass this information to the CMP that is in your webview by adding it to the URL that is called in the webview:
myWebView.loadURL("https://mywebsite.com/....#cmpimport=" + consentData);

/** to pass the att status you can use the cmpatt parameter (1=accepted, 2=declined) */

myWebView.loadURL("https://mywebsite.com/....#cmpimport=" + consentData + "&cmpatt=1");
Integration with Apple Tracking Transparency (ATT)
In case you are using tracking or analytics in your app, we recommend to read the guide on ATT implementation here.
Creating a custom layout
For a custom layout there are 2 callback functions which provide the viewController and the uiView. In the example shown below you can see how to customise the layout:
        let cmpLayout = CmpLayout.default()
        cmpLayout?.cornerRadius = 10.0
        cmpLayout?.customLayout = CGRect(x: 0, y: 0, width: 200, height: 300)
        cmpManager = CMPManager(cmpConfig: cmpConfig)
            .withCmpViewControllerConfigurationBlock({ viewController in
                viewController?.modalPresentationStyle = .formSheet
                //example of customizing controller
            })
            .withCmpViewConfigurationBlock({ uiView in
                cmpLayout?.apply(to: uiView)
                // or use your own uiView logic
            })
1. withCmpViewControllerConfigurationBlock
This function allows you to customize the view controller's presentation style for the SDK's component. By passing a configuration block, you can modify various properties of the view controller, such as its modal presentation style.
Example:
.withCmpViewControllerConfigurationBlock({ viewController in
	// Ensure the viewController is not nil before applying the configuration
	viewController?.modalPresentationStyle = .currentContext
	})
2. withCmpViewConfigurationBlock
This function allows you to customize the UI view for the SDK's component. By passing a configuration block, you can modify various properties of the view, such as its layout and appearance
Example:
.withCmpViewConfigurationBlock({ uiView in
	// Configure the uiView to display as a half-screen top layout
	CmpUIConfig.configureHalfScreenTop(for: uiView)
    })
Custom Event Listeners
To add additional process logic you can make use of Event Listeners. Following Event Listeners are available:
| Name |
Occurrs
|
|
CmpOpenListener |
Listener for Event when CMP is opened |
|
CmpCloseListener |
Listener for Event when CMP is closed |
|
CmpNotOpenedListener |
Listener for Event when CMP doesn't need to be opened |
|
CmpErrorListener |
Listener will be called, if an error occurs while calling the Server or showing the view. |
|
CmpButtonClickedListener |
Listener for Event when Button is clicked and Consent layer is closing |
|
CmpATTrackingStatusChangedListener |
Listener for ATTracking Status Changed |
|
onCmpUpdateGoogleConsent |
Listener for consent mode changes |
Import/Export Consent
To import or export the consent you can use the functions exportCMPString() and importCMPString(). Check the example below:
// Importing consent data if you like
cmpManager.importCmpString("${your base64 encoded consentString}");

// ... Your code here ...

// Exporting Consent data
let consentString : String = cmpManager.exportCmpString()
The consentString should be base64 encoded.
Internal App links and domain whitelist
To implement the functionality where certain domains are whitelisted and, when accessed within the consent platform (CMP) WebView, are not opened in an external browser like Safari but within the WebView itself, you can implement a callback mechanism to perform custom actions based on the domain, such as opening another ViewController:
cmpConfig.domainWhitelist = ["add your domains to be whitelisted"]

cmpManager.withOnCmpLinkClickListener({ url, decisionHandler in
                //check URL and add the nav action
                decisionHandler!.pointee = WKNavigationActionPolicy.allow
                decisionHandler!.pointee = WKNavigationActionPolicy.cancel
                // return shouldCloseWebView (true) or stay open (false)
                return true
            })
Logging
To implement the functionality where certain domains are whitelisted and, when accessed within the consent platform (CMP) WebView, are not opened in an external browser like Safari but within the WebView itself, you can implement a callback mechanism to perform custom actions based on the domain, such as opening another ViewController:
Internal App links and domain whitelist
To implement the functionality where certain domains are whitelisted and, when accessed within the consent platform (CMP) WebView, are not opened in an external browser like Safari but within the WebView itself, you can implement a callback mechanism to perform custom actions based on the domain, such as opening another ViewController:
When using our iOS SDK, you may find the need to debug or analyze log information for various purposes. The logs generated by our SDK are tagged under "Cmp:", allowing you to easily filter and view only the relevant logs. This guide provides step-by-step instructions on how to access these logs in Xcode.
Search for the Tag
In Xcode's debug console, you can search for logs specifically tagged with "Consent" or "CMP" to isolate the logs generated by our SDK.
Optional: Adjust Verbose Level
In CmpConfig, you can adjust the verbose level for more detailed logs.
cmpConfig.isDebugMode = true
cmpConfig.logLevel = CmpLogLevel.debug- Enables more detailed logs
- Useful for debugging and analysis.
By adjusting the verbose level, you can get more comprehensive log information, aiding in debugging and analysis of our SDK's behavior in your application.
