How to optimize PageSpeed when using consentmanager?
If you are using (any) cookie banner on your website, the website speed will be lower due to the amount of additional scripts that need to be loaded. Here are some tips how you can improve your page speed:
Technical optimization
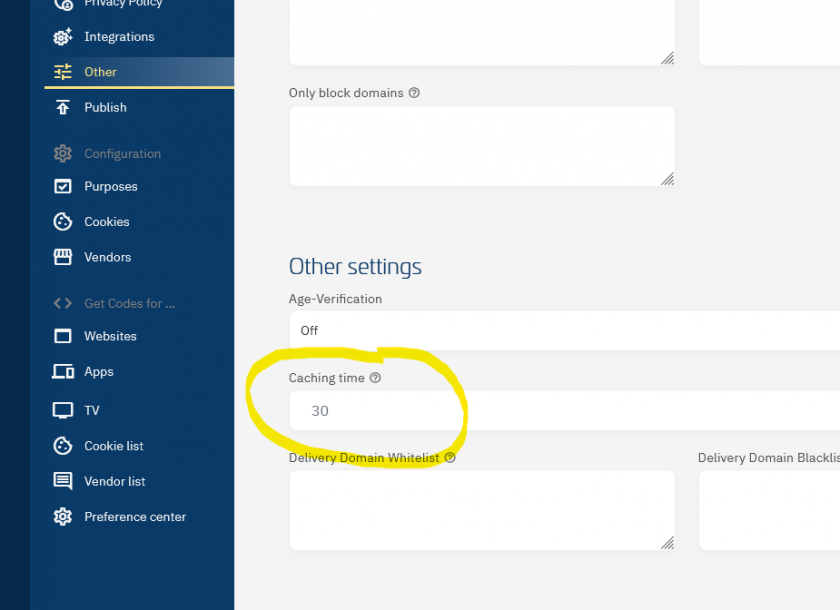
Use a high caching time
You can set the time for which scripts are cached under Menu > CMPs > Other. The default here is 30 minutes. By using higher values, you allow for longer caching and avoid that users need to request the codes again too often.

Use semi-automatic blocking code
The CMP offers you two code versions: Automatic and semi-automatic/manual blocking code. The semi-automatic blocking code is loading asynchronously and hence will have a lower impact in your page performance. We always recommend to us the semi-automatic blocking code.
Add the code directly in the page
It is always recommended to add the CMP code directly to your website code instead of adding the CMP code via a TagManager or similar. The use of a tag manager will delay the pageload by about 200-500ms and therefore negativly affect your CLS/LCP scores (see below).
Place the CMP-code as early as possible in your website
In order for the CMP to load quickly, you should add the CMP code as early as possible in your <body> or <head> tag.
Use preconnect
In order to reduce connection times, you can add the following code to your <head>:
<link rel="preconnect" href="https://delivery.consentmanager.net">
<link rel="preconnect" href="https://cdn.consentmanager.net">
Please note: Depending on your account settings, the URLs that your CMP is using might be different. Please ensure to always add the full subdomain (e.g. a.delivery.consentmanager.net) as a preconnect.
Design optimization
Cummulative Layout Shift (CLS)
For Google Search engine, the Cummulative Layout Shift (CLS) is relevant ranking factors. In order to reduce the impact of the CMP to your website we recommend the following:
- Do not use external Fonts (but only self-hosted font files if necessary) in your custom CSS of your consentmanager design
- Do not use external Images (or any images) in your custom HTML of your consentmanager design. If possible, use inline SVG images in order to avoid an additional download of the image file.
- Do not use external CSS (@import rules) in your custom CSS of your consentmanager design
- Do not use consentmanager Layout mode "Push down" (CMP > Designs > Box settings) which will appear at the top of the window
Largest Contentful Paint (LCP)
Similar to CLS (above), the LCP is another ranking factor. In order to reduce the impact of the CMP to your website we recommend the following:
- Follow the technical recommendations above (code placement, preconnect etc.)
- Use whitelabel proxy mode where possible
- Try designing the consent layer to use as little space as possible (usually only possible with Desktop layouts)
- Set the CMP settings to only show the consent layer in EU/EEA countries in order to reduce the LCP impact in other countries
- If load speed is essential, we recommend to not use imports (configuration variable cmp_waitforimport) and set the consent scope to domain specific consent (Menu > CMPs > Legal settings > Consent scope)
- Avoid designs with background images (e.g. design with cookie illustrations)
- Reduce size of the largest text by using multiple
<div>or<p>elements instead of one big text - You can set Menu > Designs > Edit > Behavior so that the layer only appears after x seconds and/or on mouse move. This can help dealing with LCP.
Interaction to Next Paint (INP)
INP describes the time that the browser needs to compute between user interaction (e.g. click on accept) and the moment when the interface reacts. In your consentmanager setup this is mainly influnced by a) the amount of vendors and b) the design options that you are using. Here are some recommendations in order to increase the INP value:
- Use as little vendors as possible
- Group vendors evenly to purposes (e.g. it is quicker to use 10 vendors per 10 purposes than 100 vendors grouped in 1 purpose.
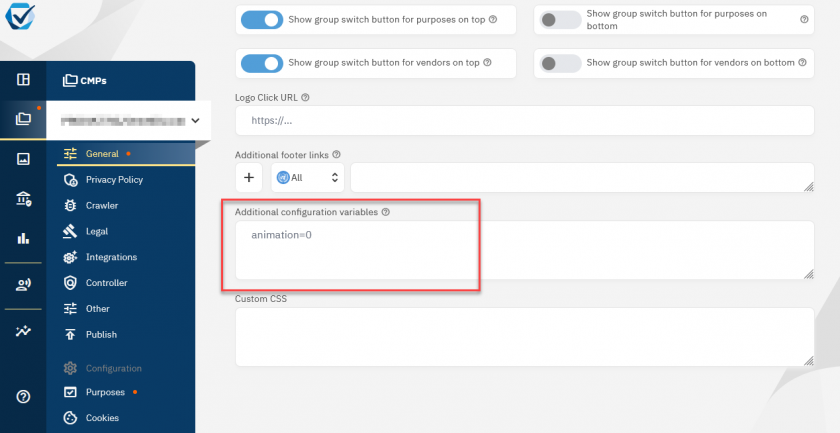
- Avoid toggle animation by either not showing toggles on the first layer (only show text / list) or by disabling animation via Menu > CMPs > General Settings and setting animation to 0:

- Use a design that does not show the vendors on the first layer (e.g. no expanded vendor list on first layer)
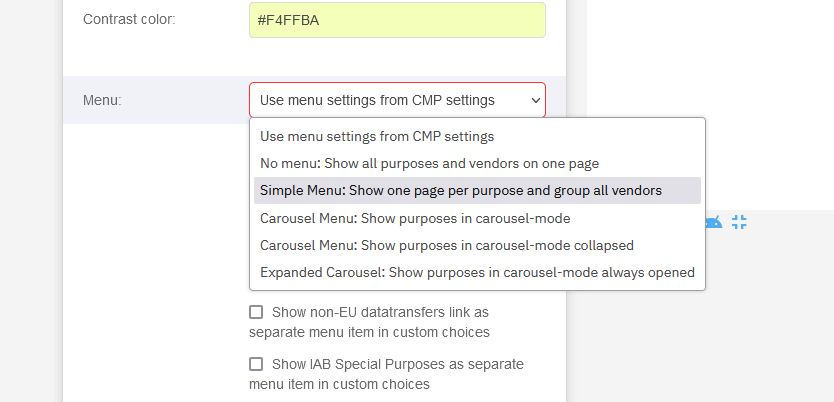
- Use a design that only shows a portion of the vendors on the second layer (preferences layer). You can set this in the design settings by expanding the box "Custom Settings Page" > Menu. Use a design with a menu and avoid designs without menu or designs with expanded carousel.


