


[CTV-API] Integration
General overview
The purpose of the API is to allow clients to develop their own consent interface for cases when the SDKs provided by consentmanager are not sufficient. The API will therefore allow the client to build their own graphical interface based on the information the API provides. In addition, the API will allow the client to use industry standards such as the IAB TCF or IAB GPP without the need to implement their own encoders/decoders.
Implementation
The implementation consists of four parts:
-
TV API
It allows querying information on the text, colors, buttons and links that should be displayed in the consent interface.
The TV API is provided by consentmanager.
-
Consent interface
It displays the consent message to allow the end-user to make a choice.
This is to be created by the app developer.
-
Consent storage
Once a choice is made, the consent storage will store these choices to use the information when needed.
This is to be created by the app developer.
-
QR-Code / Custom settings interface
If the end-user wants to make custom choices besides accept or reject, the app can show a specific QR-Code that the end-user can scan with their mobile phone. The end-user will be directed to a website where they can make their choices. Once done, the choices are sent back to the TV device using the TV API and the end-user can continue using the app.
This is provided by consentmanager.
Limitations
Since the client will implement their own interface, the API does not provide the full functionality compared to a normal web or app integration. Among others, the following features are not part of the API (among others):
|
CMP-Settings · Integrations (e.g. Adobe, Awin, etracker and so on) · Privacy APIs (DNT, GPC, ADPC, …) · Automatic Blocking · Age verification · Reduced reporting features
|
Design-Settings · Box size & position · Font size & family · Toggles / Checkboxes on the first layer · Icons for purposes, buttons and links · Support for WCAG · Behavior logic and effects |
Note: The above mentioned settings are not sent via the API but may be implemented manually by the app developer.
No limitations on settings
Besides the above mentioned limitations, there are still a lot of Features that are part of the API (when fully implemented into your app) and can be used as usual are. Among others, these are:
- Automatic alignment of texts to the language of the user
- Display of the consent layer in the colors set via CMP / Design
- Support for IAB TCF, IAB GPP, Google Consent Mode
- A/B-Testing &Machine learning of different designs
- Targeting of Designs to end-users based on language, country or other attributes
- (limited) Reporting of users, shown consent screens and choices
Setup
Prerequisites
In order to use the API you must have a consentmanager account with the feature „TV SDK“ enabled (usually included in the higher packages). You can see if the feature is included by logging into your account and navigating to Menu > CMPs > TV. If you do not see the menu item “TV”, please get in touch with your account manager to upgrade your account.
Enable TV API
To start using the API you will need to create a CMP in your consentmanager account and enable the TV API. The CMP shall follow the same settings that you would normally do for a web environment, meaning you will need to set the general settings of the CMP and add purposes and vendors. Once done, navigate to Menu > CMPs > TV and activate the toggle on Enable TV API.
Once the API is enabled, you will see the API-Endpoint below the toggle. Copy the Endpoint URL for further use in your implementation.
Note: Once the API is enabled, it will take up to 1 hour before the API-Endpoint becomes usable. Please also note that changes to the CMP- or Design-settings will reflect only on a daily basis within the TV API.
API-Flow
To implement the consent interface into an app, the app developer will call the TV API to receive information on whether or not the consent screen should be shown to this specific user. The API will also contain information on colors and texts that shall be presented to the end user as well as which buttons and links shall be displayed. Once the end-user makes a choice, the app will inform the consentmanager system via the TV API about this choice and will in return receive the consent data (e.g. IAB TCF consent string, IAB GPP string, list of activated vendors, list of purposes and so on). The app can then use this consent data to determine data processing activities or provide it to third parties (e.g. the IAB TCF consent string).
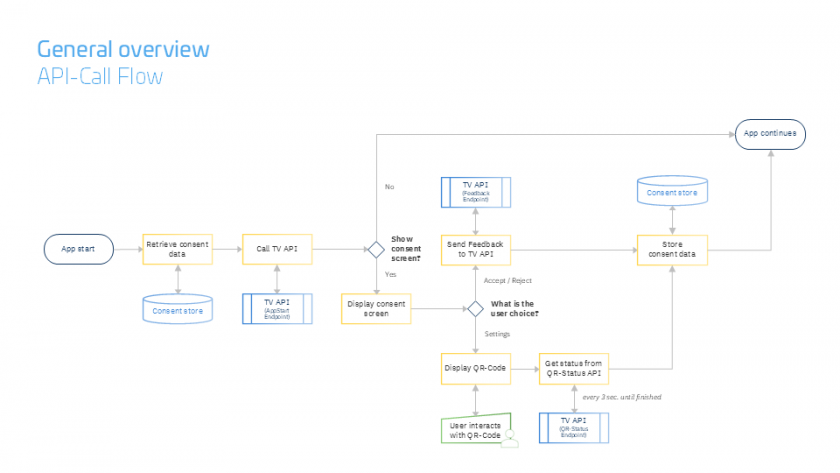
Detailed Flow Chart
Below you find the detailed flow chart for implementation of the TV API. The steps are as follows:
- App start
- App retrieves data from consent store (if present)
- App calls TV API Endpoint “AppStart” and passes existing consent string
- TV API responds with “displayLayer” set to “true” or “false” to indicate that the consent interface shall be shown
- (If displayLayer = true) App displays the consent interface using the information from the TV API
- User clicks on Accept: App calls TV API Endpoint “Feedback” for accept
--> App stores consent data and continues as normal - User clicks on Reject: App calls TV API Endpoint “Feedback” for reject
--> App stores consent data and continues as normal - User clicks on Settings: App displays QR-Code
- App calls TV API Endpoint “QR-Status” every 3 seconds for status update
- Once QR-Status is “finished” (or User clicks on “back” button), app stores consent data and continues as normal
AppStart Endpoint
The URL of the AppStart Endpoint can be found in your consentmanager Login area (see section on Setup above). The Endpoint will return a JSON object and give you two pieces of information:
- Whether or not the consent interface shall be shown
This is signaled by the property “displayLayer” with value “true” (display the consent interface) or “false” (no need to display the consent interface).
- Which styling should be used, in case you must/want to show the consent interface
This is signaled by the properties “display”
Calling the AppStart Endpoint
When calling the AppStart Endpoint, you should use the URL provided to you in your consentmanager Login area. In addition you should extend the URL by appending the following parameters:
|
Parameter |
Description |
|
|
(optional, recommended) Desired language for the display. E.g. &l=DE or &l=EN-US. The API will return the texts in this language. |
|
|
(optional, recommended) Identifier of the app. E.g. &appid=123456 or &appid=my-app-name |
|
|
(optional, required if present) The stored consent string of the user’s last choice. The consent string is passed to the app by: |
|
|
(optional) IP address of the user to be used for geolocation purposes. If no IP is passed, the IP of the request source is used. E.g. &ip=123.123.123.123 |
AppStart Endpoint Response
The API response will be a JSON encoded object in the following format:
{
 "displayLayer": true | false, //Whether to display the consent interface or not
 "display":
 {
  "colors":
  {
   "background":        "#...", //Color for the background of the consent interface
   "headline":          "#...", //Color for the headline text
   "text":              "#...", //Color for the normal text
   "comment":           "#...", //Color for less important texts
   "buttonbackground":  "#...", //Color for the background of buttons
   "buttontext":        "#...", //Color for the text in buttons
   "accept":
   {
    "buttonbackground": "#...", //Color for the background of the accept button
    "buttontext":       "#..."  //Color for the text of the accept button
   },
   "reject":
   {
    "buttonbackground": "#...", //Color for the background of the reject button
    "buttontext":       "#..."  //Color for the text of the reject button
   },
   "settings":
   {
    "buttonbackground": "#...", //Color for the background of the settings button
    "buttontext":       "#..."  //Color for the text of the settings button
   },
   "save":
   {
    "buttonbackground": "#...", //Color for the background of the save button
    "buttontext":       "#..."  //Color for the text of the save button
   },
   "highlight":         "#...", //Color for highlighted elements
   "link":              "#..."  //Color for link texts
  },
  "texts":
  {
   "headline":          "...",  //Text for the headline
   "text":              "...",  //Text for the main text
   "accept":            "...",  //Text for the accept button
   "reject":            "...",  //Text for the reject button
   "settings":          "...",  //Text for the settings button
   "save":              "...",  //Text for the save button
   "settingsheadline":  "...",  //Text for the headline in the settings page
   "settingstext":      "...",  //Text for the text in the settings page
   "backlink":          "..."   //Text for the back link in the settings page
  },
  "layout":
  {
   "buttons":           [...],  //Set of strings representing the buttons to be displayed.
                                //Options: "accept", "reject", "settings", "save" (min. 1, max. 3)
   "links":             [...]   //Set of strings representing the links to be displayed
                                //Options: "settings", "privacy", "tac", "imprint" (min. 0, max. 4)

  }
 },
 "links":
 {
  "privacyurl":    "https://...", //Link to privacy policy
  "tacurl":        "https://...", //Link to terms and conditions
  "imprinturl":    "https://..."  //Link to imprint / legal notes
 },
 "customsettings":
 {
  "link":          "https://...", //Link to a webpage where the end-user can customize their settings
  "qrcodeimage":   "https://...", //URL of an image (PNG, 196x196 px) of a QR Code
                                  //The QR-Code should be displayed to the end-user to allow customization
  "statusurl":     "https://..."  //QR-Status Endpoint URL to be queried for status updates on the end-user
 },
 "feedback":
 {
  "accept":        "https://...", //Feedback Endpoint URL for signaling that the user clicked on accept
  "reject":        "https://..."  //Feedback Endpoint URL for signaling that the user clicked on reject
 }
}
Styling the consent interface
Especially when using industry standards such as the IAB TCF or IAB GPP, consentmanager is by policy required to ensure that certain standards are uphold by its clients. We must therefore require all clients to use the information supplied via the AppStart Endpoint to compose the design of the consent interface.
Important: In order to ensure that all rules are followed, we require all clients to submit a sample screenshot of the consent interface they have created for approval.
IAB TCF & GPP Compliance
In order to ensure IAB TCF & GPP compliance we must require all clients to use the elements supplied via the AppStart Endpoint, specifically:
- The consent interface must display a headline and text on the first screen. Headline and text must be taken from the API and displayed in full. They may not be obscured, shortened or otherwise invisible.
- The consent interface must display the buttons indicated by the API and with the label text given by the API. Buttons must be visible immediately and may not be obscured.
- The consent interface must display the links indicated by the API. Links must be accessible by the client but do not need to be immediately visible. Anyhow we recommend always making all links visible.
- The consent interface shall use the colors indicated by the API. If that is not possible due to restrictions of the device, the consent interface must be designed in a way that ensures that all buttons have the same importance.
Feedback Endpoint
The response of the AppStart Endpoint will contain two URLs via “feedback.accept” and “feedback.reject”. These URLs shall be called by the app once the user choose to accept or reject the privacy settings.
Calling the Feedback Endpoint
The Feedback Endpoint URLs are already pre-constructed by the AppStart Endpoint API call and do not need to be changed or appended. Please call the correct URL corresponding to the users choice.
Feedback Endpoint Response
The API response will be a JSON encoded object in the following format:
{
 "feedback":        "...", //Consent status for the user, one of "accept", "reject", "custom" or "error"
 "consentstring":   "...", //consentmanager specific consent information to be stored on the device.
                           //This string needs to be passed back with the next request to the AppStart

                           //Endpoint as parameter &cs=...
 "vendorConsents":  {...}, //Object of vendors that have consent. Format is "vendorID":true|false
                           //For example: {"s26": true, "c172": false}
                           //Note: If a vendor ID is not present, you MUST assume no consent for this ID
 "vendorLI":        {...}, //Object of vendors that have legitimate interests. Format as above.
 "purposeConsents": {...}, //Object of purposes that have consent. Format as above.
 "purposeLI":       {...}, //Object of purposes that have legitimate interests. Format as above.
 "iabtcf":          "...", //IAB TCF Consent String
 "iabgpp":          "...", //IAB GPP String
 "addtlConsent":    "...", //Google Additional Consent String
 "metadata":               //List of objects to be stored in device shared storage
                           //(e.g. NSUserDefaults, SharedPreferences or similar)
 [
  {                        //Each object in the list contains 3 properties:
   "name":          "...", //Name (or key) of the data to be stored (e.g. keyname for SharedPreferences)
   "value":         "...", //Value to be stored
   "type":          "..."  //Type of the value to be stored, can be “string” or “int”
  },
  ...
 ]
}
QR-Code Endpoint
In case the user clicks on settings, the app shall show a second consent screen displaying a QR code (and optional URL). The user will then scan the QR-Code and continue making their privacy choices on their mobile phone. While the user is doing this, the app shall check the current status of the procedure.
For this, the response of the AppStart Endpoint will contain a URL via “customsettings.statusurl”. This URL shall be called by the app once the QR-Code is displayed to the user. We recommend calling the URL every 3 seconds in order to check for updates.
Calling the Feedback Endpoint
The QR-Code Endpoint URL is already pre-constructed by the AppStart Endpoint API call and does not need to be changed or appended. Please call every 3 seconds while the user is making their choices.
QR-Code Endpoint Response
The API response will be a JSON encoded object in the following format:
{
 "status":         "...", //Status of the process, one of:
                          //„initialized“ – User did not open the custom settings page yet
                          //„pending“     – User opened the custom settings page
                          //„finished“    – User finished their choices
                          //„error“       – An error occured

 "feedbackobject":        //In case of status=finished, the object will contain all consent data similar
                          //to the Feedback Endpoint API
 {
  ...
 }
}
Other Implementation Information
Consent storage
Whenever the user made a choice or the QR-Code process finishes, the API will return the feedback object with all details. We recommend app developers to store the full object.
Error handling
Since the app is depending on a call to an external API, we recommend various error handling strategies in order to avoid issues and bad user experience:
-
API errors
In case when an API returns an unexpected HTTP status code (e.g. 4xx, 5xx or 6xx), the app shall treat this as an error. The app should fallback to a default state or logic and skip the next steps in the process. In cases when HTTP status code 3xx is sent or otherwise a location change is signaled, the app shall follow to the signaled URL (Note: Apply a maximum follow rule to avoid infinite loops).
-
Timeouts
All API calls shall have a maximum timeout, e.g. 15 seconds. If the API does not respond within this timespan, it should be considered offline. The app should fallback to a default state or logic and skip the next steps in the process.
-
SSL validation
Especially with older devices, SSL validation can cause issues when certificate versions or encryption methods are no longer supported. If that is the case, app developers can call the API Endpoints via http instead of https.
-
Parsing errors
All API endpoints are returning JSON objects as UTF-8 encoded strings. When parsing the string, the app should verify that the parsing worked as expected. Furthermore, the app shall:- Treat all properties of all objects as optional and always check if a property exists before accessing it.
- Check whether the returned value of a property is of the expected data type (e.g. string, bool or integer).
- Be flexible on object structure. Some objects have a dynamic structure and can occur with more or less properties. If an app does not know a property, it shall ignore it.
-
QR-Code Status error
In cases when the QR-Code Status Endpoint returns status=error, the app should abort the consent collection and resume as normal.
- QR-Code abandoned
In cases when the QR-Code is displayed but no status change is observed for a longer time, the app shall return to the initial consent interface (first screen) and allow the user to choose again. We recommend a maximum wait time of 5 minutes before returning to the first screen.
Version management
The API versions are managed via the AppStart Endpoint URL. In case of an API change, we will update the AppStart Endpoint URL to a new version to allow having multiple versions active at the same time.
