Implementing a Pay-or-Accept (PUR) Model
Especially for news publishers a consent mode that allows the visitor to only choose between advertising or a paid subscription can be an interesting model. Publishers can impelemt that pay-or-accept model (also known as PUR or Accept-or-subscribe) either by using our integrated contentpass module or by implementing the service by themselves.
Design conciderations
When implementing a pay-or-accept model, publishers will need to use custom HTML in order to display the payment gateway. The general recommendation is to have both options (pay or accept) in equal prominence and similar design.
Technical implementation
The technical implementation of an own payment model is as follows:
- If a pay-or-accept model shall be used on the website, the website should set the variable
window.cmp_pur_enable = true;. This will enable the internal checking mechanisms. When enabled, the layer will always show, unless either full consent (all vendors + purposes enabled) is given or the login-signal is present. Please ensure that the variable is set before the CMP-code.
- Once the user paid and logged in, the website should signal this to the CMP by setting the variable
window.cmp_pur_loggedin = true;. When logged in, the CMP will automatically reject all vendors and purposes that can be rejected.
Note: Please ensure that this variable is either set before the CMP-Code or, in case when that's not possible, usewindow.cmp_waitforimportin order to delay the CMP load while waiting on the login status.
- In cases when third party codes shall be blocked only when a user is logged in, you should use the attribute
data-cmp-block="purmodel"in order to signal to the CMP that this script or iframe shall be blocked.
Note: If semiautomatic blocking is used, you will need to prepare the element for blocking by updating the attributes.
The normal user flow will be:
- Visitor comes to the website. The automatic blocking code will block all third party elements and/or the webmaster has prepared the codes for semiautomatic blocking.
- The CMP receives the signal cmp_pur_enable and checks if consent or a login are given.
- For a new user, neither consent nor a login will be given, hence the consent layer will be shown.
- a) the user clicks on accept all, the consent layer is removed and the user can continue using the website
b) the user clicks on login or pay and is redirected to a new page in order to perform the login or payment (Note: The login/payment page should not include the CMP-code and should not use non-essential third party codes) - Once the user paid and/or logged in, the user is redirected back to the website. The website signals cmp_pur_enable AND cmp_pur_loggedin. The CMP disables all vendors and purposes and does not show the consent layer.
Configuration variables
| Variable | Description |
window.cmp_pur_enable |
Must be set to true in order to enable pay-or-accept modes. When using the integrated contentpass module, this will automatically be set to true. |
window.cmp_pur_loggedin |
Signal to the CMP whether or not the user is logged in as a paid user. |
window.cmp_pur_mode |
Sets how the CMP should treat visitors with existing choices. Set to 0 (default) to signal to the CMP that visitors with existing choises that did not accept all vendors, shall be presented with the consent layer again. Set to 1 to signal to the CMP that visitors with existing choises that did not accept all vendors, shall not be presented with the consent layer again. Set to 2 to signal to the CMP that certain purposes (set via |
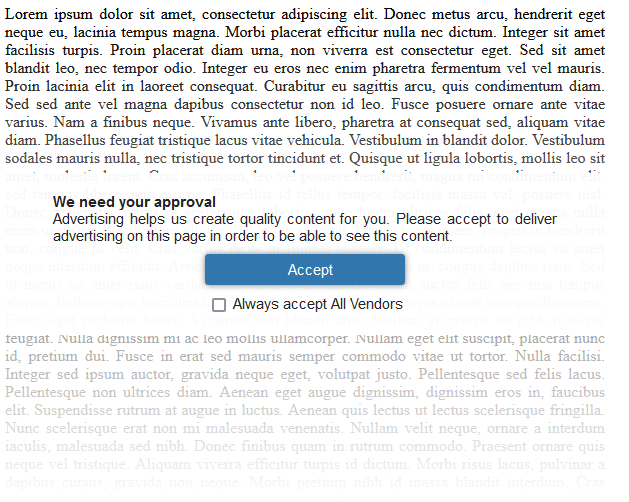
Hiding content for visitors that did not accept
In order to force users to make a choice, you can hide content on your page in case when users did not accept. In order to do this, you can add class="cmplazyload" data-cmp-block="textblocking" on any element in your page. For visitors that did not accept all vendors and purposes (and did not login via contentpass or pur model) the CMP will fade out the element and display a consent message instead.
You can use data-cmp-preview-... attributes and data-cmp-vendor / data-cmp-purpose attributes in order to customize the layout and behavior. By default data-cmp-vendor and data-cmp-purpose are set to * (require consent for all purposes and vendors).
Example:
<div class="cmplazyload"
     data-cmp-block="textblocking"
     data-cmp-preview-text="Advertising helps us create quality content for you.
                            Please accept to deliver advertising on this page in order
                            to be able to see this content.">

Lorem ipsum dolor sit amet, consectetur adipiscing elit. Donec metus arcu, hendrerit
  eget neque eu, lacinia tempus magna. Morbi placerat efficitur nulla nec dictum. Integer
  sit amet facilisis turpis. Proin placerat diam urna, ...
</div>
Above example will look like this whenever the user did not accept all vendors & purposes: