


Working with Google Consent Mode
If enabled, the CMP will send additional consent information to GTM, Google Ads and Google Analytics.
Looking for a CMP that supports Google Consent Mode? See our Google Consent Mode v2 product page.
Implementation
Implementation instructions can be found in other documents of our help section:
- Consent Mode v2 + Automatic Blocking Code
- Consent Mode v2 + Manual / Semiautomatic Blocking Code
- Consent Mode v2 + GTM
- Consent Mode v2 + inApp SDKs
- FAQ: Consent Mode v2 + Google Analytics (GA4)
- FAQ: Do I really need Google Consent Mode? (Consent Mode vs. IAB TCF vs. Additional Consent vs Limited Ads)
Intro Video
What is Google Consent Mode?
The consent mode is a (additional) mechanism that can be used to signal consent/rejection to Google Analytics, Google TagManager and other Google Tools. It can be used to in order to make tracking on a website more "GDPR-friendly" by reducing the data that is tracked and the cookies that Google Analytics will set.
The main idea behind Google Consent Mode is to always run analytics on a page: In cases when the user consents, the full reporting will be generated. And in cases when the user does not give consent, only limited data is sent to Google. This limited data can be used in order to model the missing data (see modelling below).
Important: From March 2024 on, Google requires websites that use Google services (e.g. Analytics or AdWords tracking) to provide the Consent Mode v2 signal. Without Consent Mode enabled, a website or app is in violation of Google's EUUCP (EU User Consent Policy).
What is Google Consent Mode NOT?
The consent mode DOES NOT make a website GDPR-compliant. In most cases, any non-essential measurment will need consent. Using the consent mode can reduce the risks in cases when you do not want to perform a full blocking on Google Analytics.
Please also note, that one of the main features of consent mode is the modelling. The modelling comes with some minimum requirements (e.g. 100 ad clicks per day per country and domain). If you do not reach the minimum requirements, the modelling will not be used or may produce very limited data.
Note: The use of Google Consent Mode makes most sense when no blocking is active. Anyhow, if you use blocking of Google Analytics, Consent Mode can help to (re-)model the missing users.
Note: Please note that Consent Mode will work only if it is setup in the right order. A wrong setup might cause less data to be tracked compared to when not using consent mode at all.
Note: Please note that in most cases any measurment will require consent. We therefore recommend to always block Google Analytics on your website until consent is given.
Google Consent Mode Modelling
One of the advantages of using Google Consent Mode is modelling that happens for users that rejected. If an sufficient amount of data is generated (current required minimum is 100 ad clicks per day), GA will take the data from users that accepted and try to apply the data on the users that rejected. This way, modelled tracking data can be generated, even for users that rejected.
Example Screenshot from Google's Modelling description:
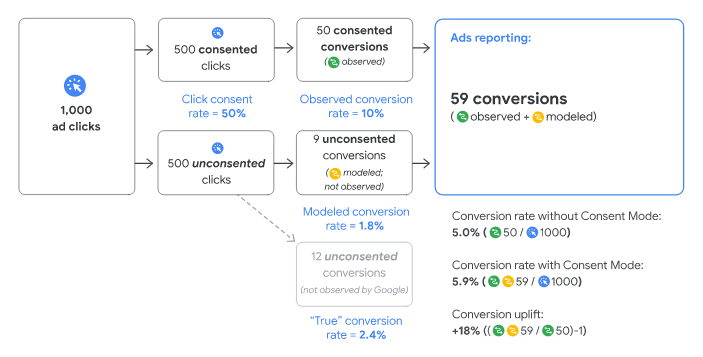
(Source: Google)
The example above shows 1000 ad clicks (users coming to your website), from which 50% click on accept and 50% on reject. From the data that is generated by consented users, GA can forecast the data for unconsented users. As a result, the website will see more data in their GA reports.
Advanced Implementation vs Basic Implementation
Google allows two ways of implementing the Consent Mode: Basic and Advanced. With the Basic implementation, all Google Tags will be blocked until consent is granted ("hart blocking"). In this case Google will use Conversion modeling in GA4 and Google Ads but no behavorial modeling in GA4.
With the "Advanced Implementation", Google tags are not blocked. Google's tags will recognize the consent mode signals and limit the tracking and setting of cookies. In this case Google will use "cookieless pings" - a way of calling Google servers to transmit event information (e.g. pageview or sale information) without setting cookies and only including functional, non-identifying information.
Enabling Google Consent Mode in consentmanager
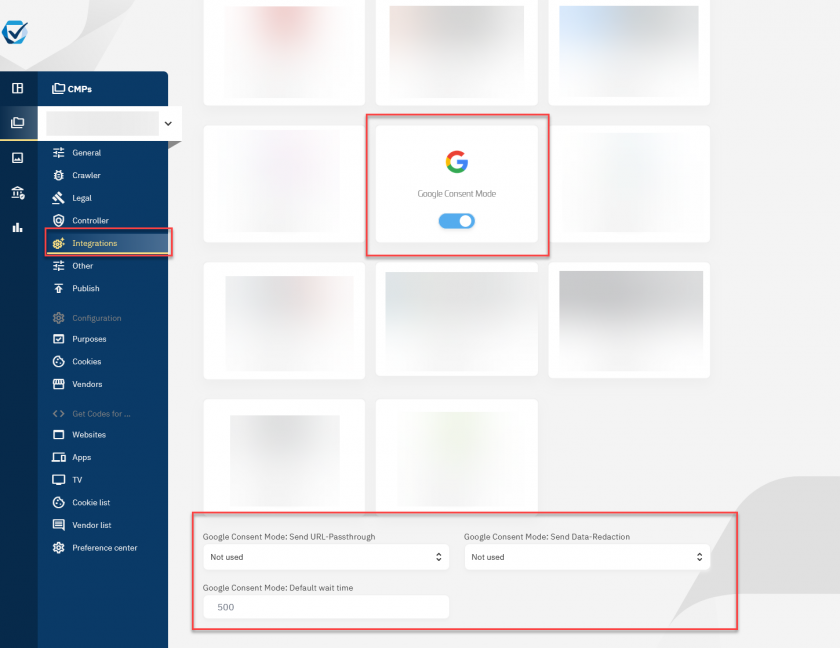
In order to enable the Google Consent Mode, please go to Menu > CMPs > Integrations and enable Google Consent Mode (old Interface: Menu > CMPs > Edit > Other settings). It is required to enable Consent Mode in the CMP settings AND perform the above described code adjustments.
How to check if Consent Mode is working?
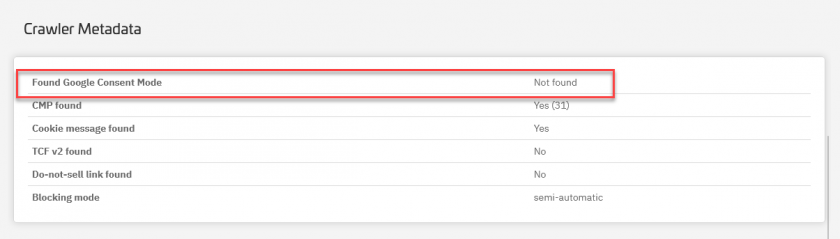
- Go to Menu > Compliance > Cookie Crawler and start a new manual crawl
-
Once the Crawl is finished, you will see the Consent Mode details at the bottom of the Crawl Results:
Technical check for Google Consent Mode
- Open your website with cleared cache or incognito mode.
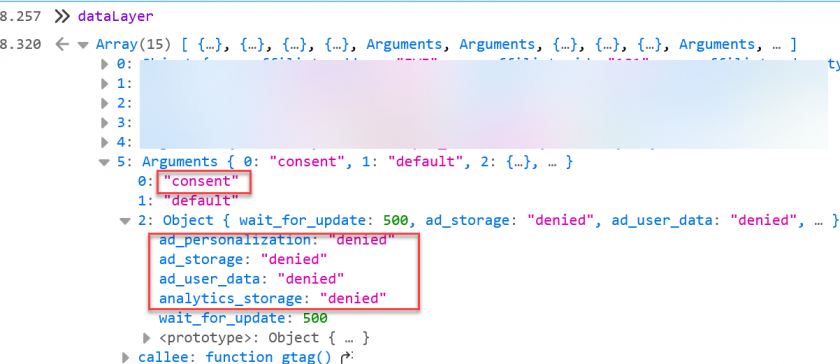
- In your developer console (Windows: F12 button), insert
dataLayerinto the console and press Enter. -
Open the dataLayer object and search for the very first
consentevent. It should contain the following properties and each property should be set todenied:analytics_storage,ad_storage,ad_user_data,ad_personalization. Example:
- In the cookie layer, accept the vendor Google Analytics or Google Ads (or accept all)
- Now search in the
dataLayerfor theconsent updateevent, the variables should now begranted: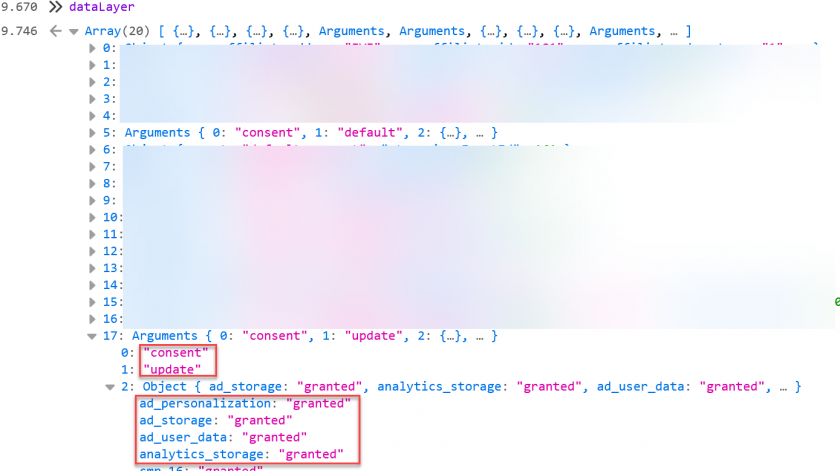
Decrypting the &gcd= parameter in Google Ads and Google Analytics
With Google Ads (Adwords) and Google Analytics tracking calls, Google will add a new parameter called gcd. The parameter is a combination of the four Google Consent Mode properties:
&gcd=XY[ad_storage]Y[analytics_storage]Y[ad_user_data]Y[ad_personalization]ZWhere X is the number or character (most cases a number 1), Y is a separator (again number or character, mostly a 3 or 1) and Z is the end delemiter (numer or character, mostly a 5). The numbers can vary from website to website.
For each of the consent mode properties (ad_storage, analytics_storage, ...) you will see a character indicating the consent state at the beginning of the page load and the moment when the event was fired. Several values are possible, here are some examples:
| Letter | Default Status | Updated Status | Description |
l |
not set | not set | No consent mode was found |
p |
denied | not set | Default status sent, but no update sent |
q |
denied | denied | Default status sent and user rejected |
t |
granted | not set | Default status sent, but no update sent |
r |
denied | granted | Default status sent and user accepted |
m |
not set | denied | No default status sent and user rejected |
n |
not set | granted | No default status sent and user accepted |
u |
granted | denied | Default status sent and user rejected |
v |
granted | granted | Default status sent and user accepted |
A typical parameter would be for example:
-
&gcd=13r3r3r3r5- Default was denied and user accepted &gcd=13l3l3l2l2- No consent mode active
Troubleshoot Google Consent Mode with Tag Assistant
You can also debug Google Consent Mode with Google's Tag Assistant, please see Google's official documentation:
https://developers.google.com/tag-platform/security/guides/consent-debugging
Consent Mode logic & types
Once the Google Consent Mode is activated, the CMP will automatically send the consent information granted or denied to gtag/GTM. The CMP will automatically distinguish which Google Vendor is activated/deactivated and will send the correct info to Google. Currently the mapping is as follows:
| Vendor ID | Google Consent Type | Description |
| s1, s1498 |
ad_storage, ad_user_data, ad_personalization
|
Will enable/disable advertising cookies s1498 (Google Advertising Products 755) s1 (Google Ads) |
| s26 | analytics_storage |
Will enable/disable analytics cookies. s26 (Google Analytics) |
| every other vendor | cmp_[vendorid] |
Will enable/disable the vendor (e.g. cmp_s123 for vendor 123) |
| every purpose | cmp_purpose_[purposeid] |
Will enable/disable the purpose (e.g. cmp_purpose_5 for purpose 5) |
In addition to the above consent types, the system will also send wait_for_update (via default value 500) and can set url_passthrough and/or ads_data_redaction to true or false depending on your settings.
Note: Google also defines functionality_storage, personalization_storage, security_storage and third_party_storage as additional properties. Please note that these properties are NOT used in ANY of the Google tools. These properties are meant only for publishers if they want to use them for their own purposes. Since this does not match the usual behavior of most of our clients, we recommend to instead use the above mentioned properties (cmp_... and cmp_purpose_...). If you want to use the above mentioned types (functionality_storage, personalization_storage, security_storage and third_party_storage and others), you can use custom consent matching (see below).
Note: The additional vendor/purpose support in GTM is currently very limited. We therefore do not recommend to use cmp_... and cmp_purpose_... but instead adjust your triggers as described in the GTM help section.
In addition to the above mentioned Google Consent Types, you can create custom consent matching types by using Client-side Configuration Variables for each purpose. For example the following line will set functionality_storage to granted whenever purpose c53 is given consent:
consentmode_c53=functionality_storage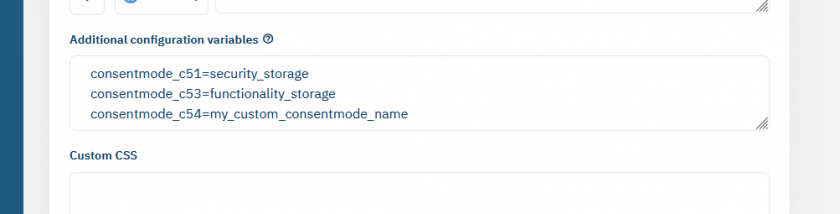
More Information
More Information can be found here:
- https://support.google.com/analytics/answer/9976101
- https://developers.google.com/gtagjs/devguide/consent
- https://support.google.com/google-ads/answer/10548233
