Working with GTM + Google Consent Mode v2
Looking for a CMP that supports Google Consent Mode? See our Google Consent Mode v2 product page.
The Google Tag Manager offers an integration of the Google Consent Mode v2 signals that can be used to trigger events, e.g. the tracking of pageviews through Google Analytics. The Google Consent Mode differentiates between two modes: Basic Implementation and Advanced Implementation.
Google Consent Mode v2 "Basic Implementation" via GTM
The Basic Implementation is the way in which the Google Analytics Tags or Google Ads Tags are not fired if no consent is given. This is usually also called "hard blocking". The advantage here is a higher legal safety. The downside is a less accurate tracking (for users that did not give consent).
In order to implement the Basic Implementation of either Google Analytics or Google Ads via GTM please follow these steps:
- Ensure Consent Mode is enabled (Menu > CMPs > Integrations > Google Consent Mode)
- Ensure Google Analytics, Google Ads or the other Google services are in your vendorlist
- Install the consentmanager CMP Code in your website (either direct as automatic blocking code, semi-automatic block code or indirect via GTM template).
- Enable Google Consent Mode in the CMP settings
- Enable Google Consent Mode in your GTM account
- In GTM, create variables as needed: In GTM go to Variables > New and click on configure:
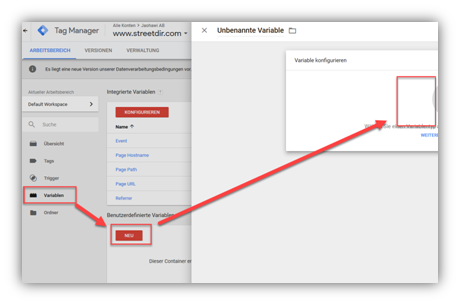
- Choose variable type Page Variables > Data Layer Variable, set the Variable Name to
cmpConsentVendors: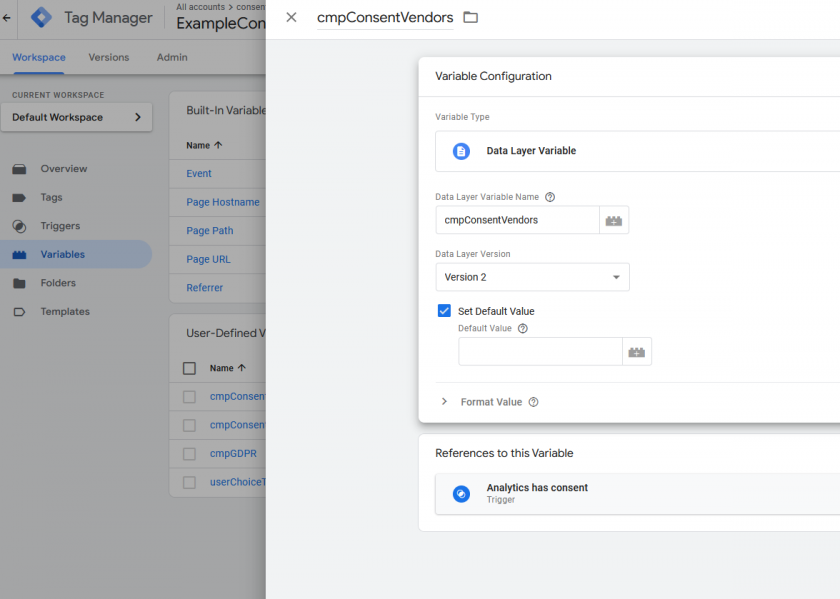
- Go to Triggers > New and click on configure:
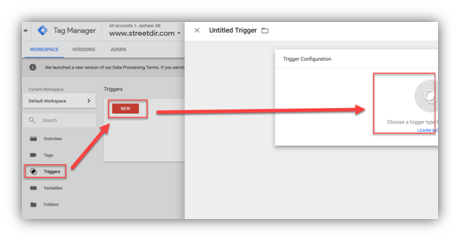
- Use event Name
cmpEventand one custom events to it: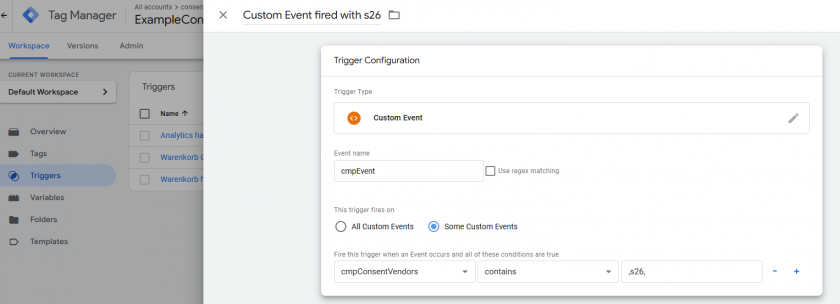
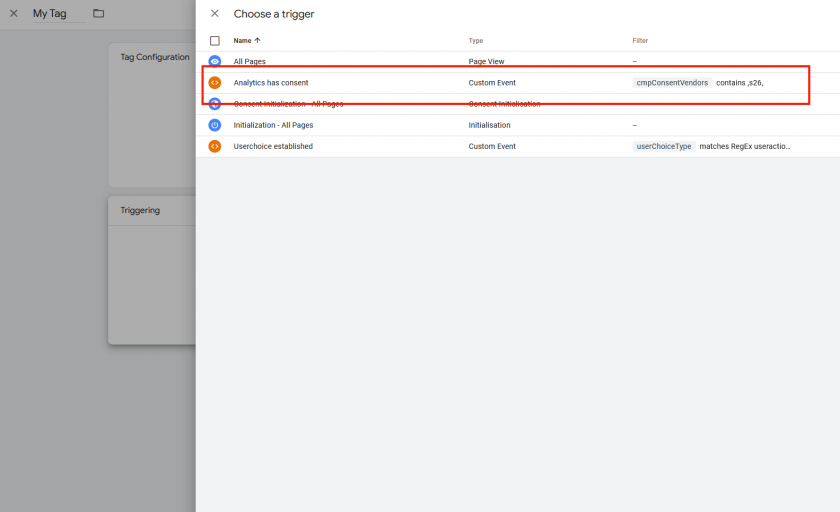
- For each event at least one rule is necessary, for Google Analytics tags use:
cmpConsentVendors contains ,s26,(include the comma in the rule). For Google Ads (AdWords tracking, remarketing, ...) usecmpConsentVendors contains ,s1,ORcmpConsentVendors contains ,s1498,(include the comma in the rule, use vendor ID depending on the vendors you use in your vendor list)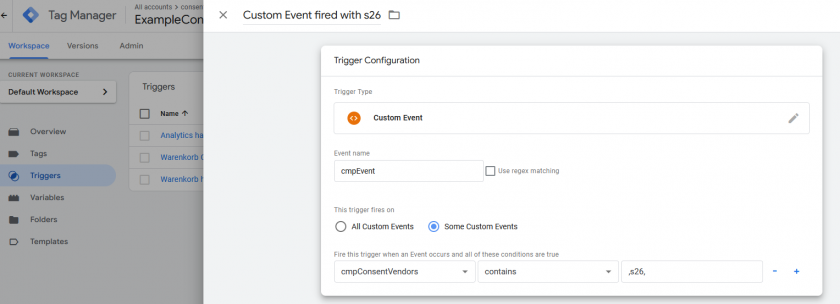
- Go to Tags > Edit > Triggers and assign the trigger to the tag:
(Ensure to remove system events such as pageview and only use the cmpEvent)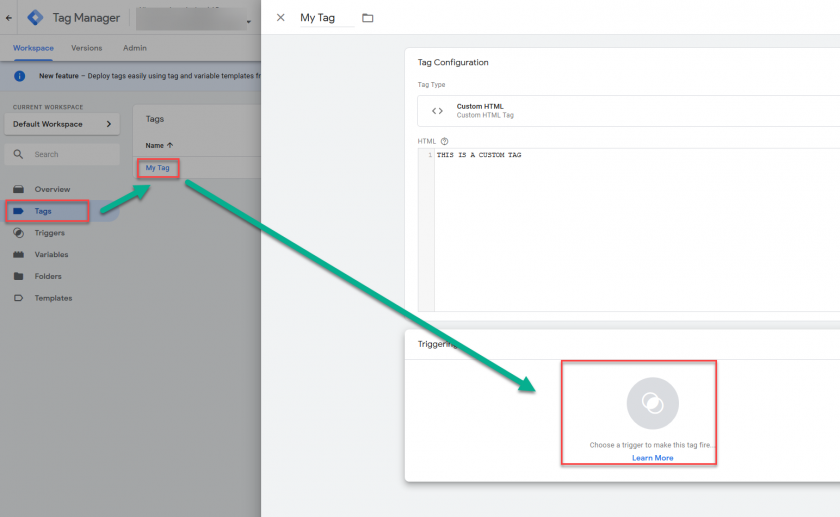
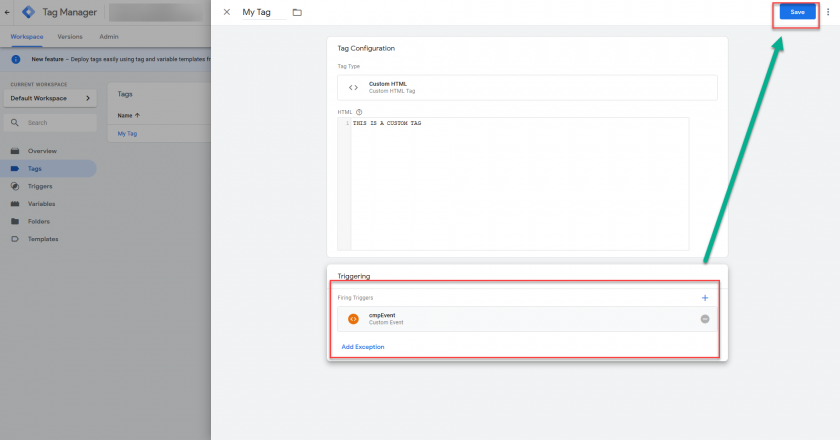
Important: Ensure that the trigger is the only trigger for each tag you are using. Do not combine triggers with other triggers/events like "All pages" or "On page load" and so on.
Google Consent Mode v2 "Advanced Implementation" via GTM
The Advanced Implementation is the way in which the Google Analytics Tags or Google Ads Tags are fired even if no consent is given. In this case the Consent Mode signals are used to tell Google Analytics or Google Ads to limit the tracking. This is usually also called "soft blocking". The advantage here is a higher accuracy in tracking. The downside is a lower legal safety.
In order to implement the Advanced Implementation of either Google Analytics or Google Ads via GTM please follow these steps:
- Ensure Consent Mode is enabled (Menu > CMPs > Integrations > Google Consent Mode)
- Ensure Google Analytics, Google Ads or the other Google services are in your vendorlist
- Install the consentmanager CMP Code in your website (either direct as automatic blocking code, semi-automatic block code or indirect via GTM template).
- Enable Google Consent Mode in the CMP settings
- Enable Google Consent Mode in your GTM account
- Decide whether you want to fire Google Analytics BEFORE or AFTER the user made a choice:
- If you want to fire Google Analytics before any choice is made (e.g. the consent layer is still open), you do not need to adjust the triggers in GTM. We recommend to fire the tags on event
cmpEvent(instead of pageview or similar) and do not add more filters (skip step 5 in the below description). In addition, you can also adjust the setting in Menu > CMPs > Legal settings > Opt-Out Mode to "On page load" or "On layer show" in order to trigger certain events earlier. - If you want to wait for the users choice and fire Google Analytics after the choice is made (consent layer is closed), please include to add the filters (use step 5 in the below description). This triggers the tag also when the user rejected.
- If you want to fire Google Analytics before any choice is made (e.g. the consent layer is still open), you do not need to adjust the triggers in GTM. We recommend to fire the tags on event
Adjust GTM triggers for Advanced Mode
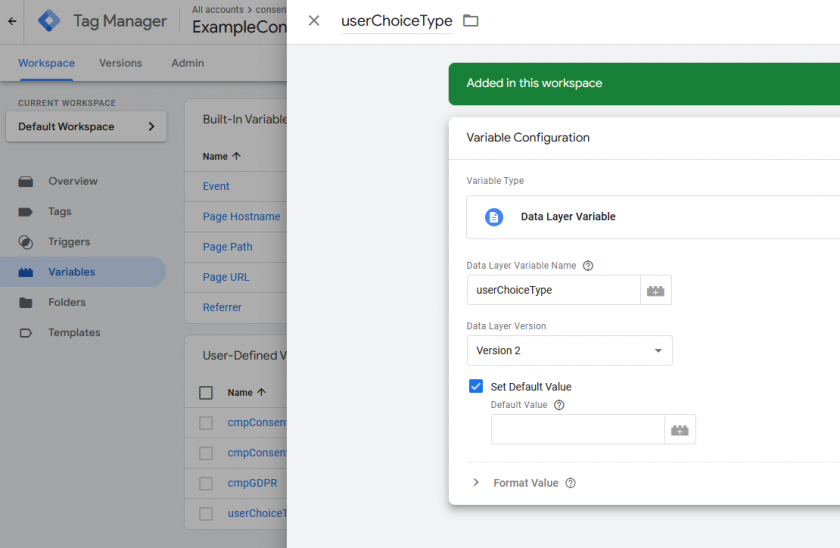
- In GTM, create variables as needed: In GTM go to Variables > New and click on configure:

- Choose variable type Page Variables > Data Layer Variable, set the Variable Name to
:
- Go to Triggers > New and click on configure:

- Create a Custom Event and use event Name
cmpEvent:
- For each Trigger at least one rule is necessary:
RegEx "|"
Note: Skip this step if you want to fire the tags also before the user made a choice.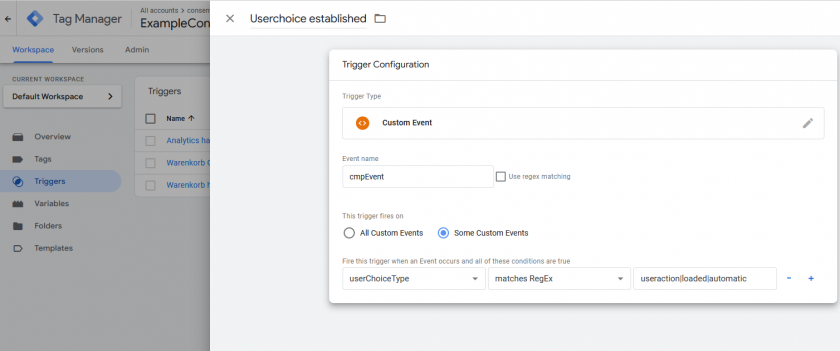
- Go to Tags > Edit > Triggers and assign the trigger to the tag:
(Ensure to remove system events such as pageview and only use the cmpEvent)
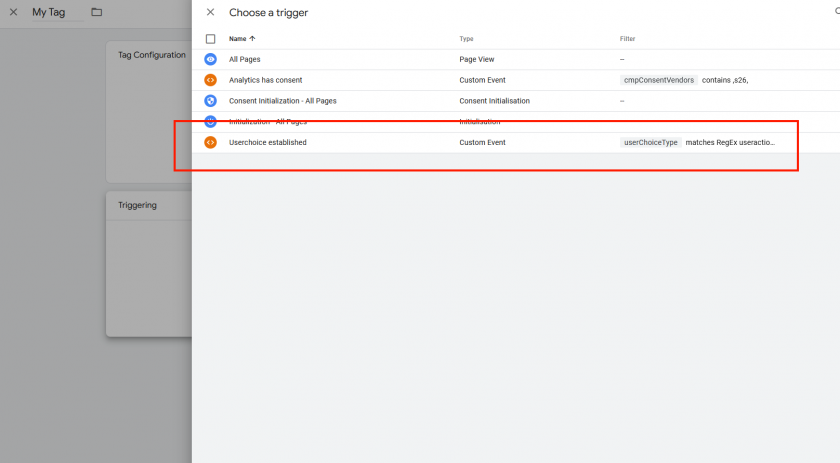

Important: Ensure that the trigger is the only trigger for each tag you are using. Do not combine triggers with other triggers/events like "All pages" or "On page load" and so on.
How to handle events that are triggered based on user action?
For events that are triggered based on user action (e.g. add to basked) we recommend:
Basic Implementation: Use your existing trigger (the add-to-basked event) and add a condition for the specific vendor, e.g. cmpConsentVendors contains ,s26, . Ensure that this trigger is alway fired after consent is given.
Advanced Implementation: No adjustment to triggers is necessary.
Displaying Consent Mode information in Google Tag Manager (GTM)
GTM also offers the possibility to work with Consent Mode in order to protect tags from triggering. In order to use this feature you can use our GTM Template and or you can manually implement the CMP into the page or the tag manager.
Please note that the Consent Mode feature for GTM is ONLY a visual help and will not perform any actual blocking.
In order to enable the Consent Mode in GTM please follow these steps:
- Login to your account and click on Admin > Container Settings
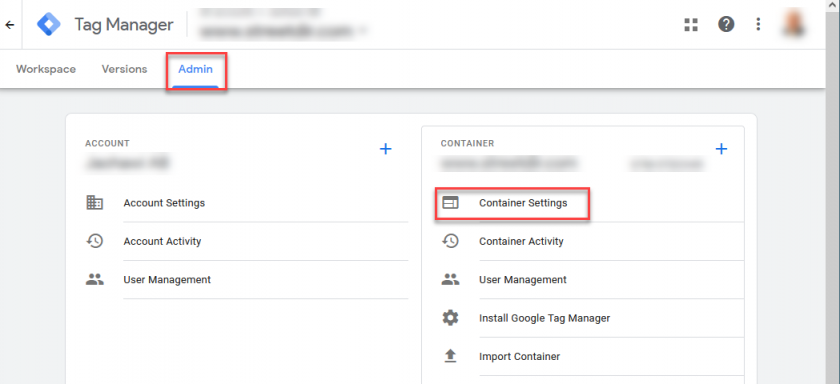
- Check the box "Enable consent overview" and press Save
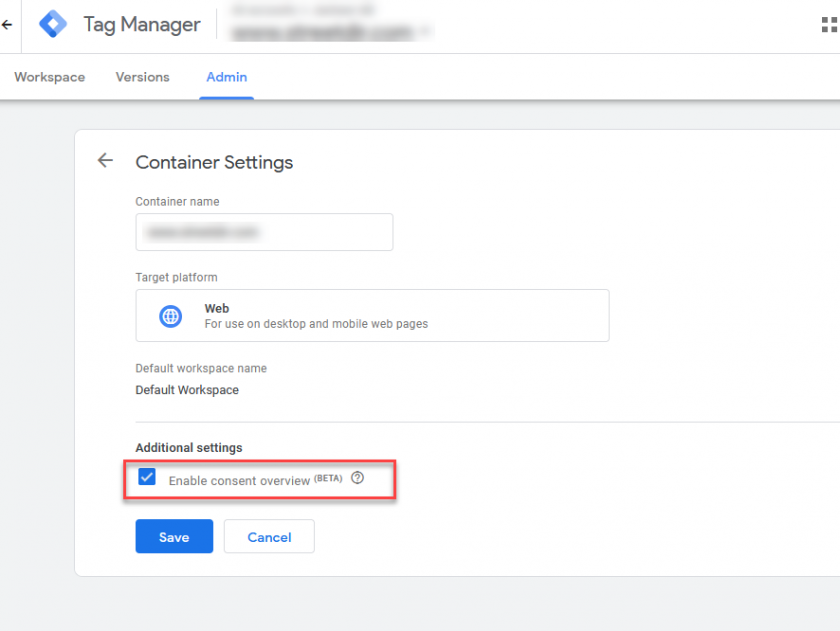
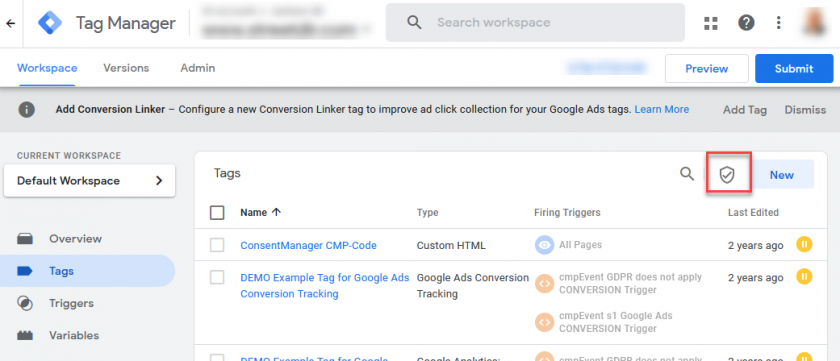
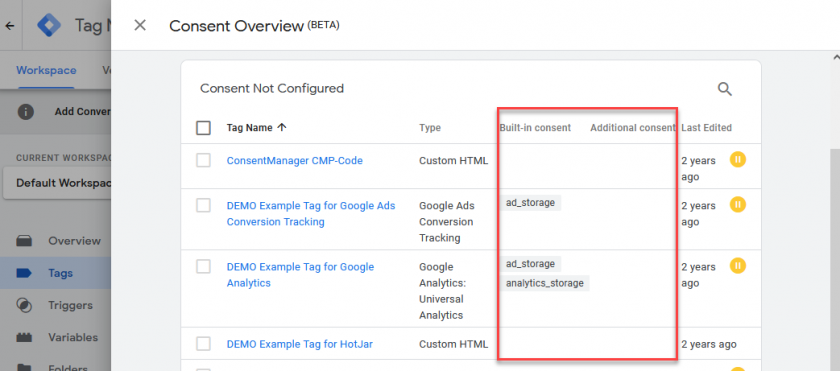
- Once enabled, you will find a shield icon under Tags which will show you which Consent Mode settings are applied to which tag:
