Google Tag Manager (GTM)
Please note: If you want to deliver the consentmanager code via GTM, only the manual blocking code can be delivered using a TagManager. If you want to use automatic code blocking, you need to insert the CMP-Code directly into your website.
Please note: The system will push information to window.dataLayer. GTM offers the option to rename this variable to another value. If that is the case, the data will no longer be received by GTM. Therefore please ensure not to (re)name the variable other than dataLayer.
General Information
In order to use consent information with Google Tag Manager (GTM), the CMP will push so called data layers into GTM. The CMP will create the following data layer variables:
|
Variable |
Description |
|
cmpRegulation |
String of Regulation name (e.g. GDPR, CCPA and so on) |
|
cmpConsentString |
Sets the IAB consent string |
|
cmpConsentVendors |
Sets a comma separated list of vendor IDs that got consent, e.g. ,3,7,s22,31,c88, (list starts and ends with comma) |
|
cmpGoogleVendorsConsent |
Same as cmpConsentVendors but included are the Google ATP IDs. |
|
cmpConsentPurposes |
Sets a comma separated list of purposes that got consent, e.g. ,1,2,s3,s4,s5, (list starts and ends with comma) |
|
cmpCurrentStatus |
Current cmp event status name. Possible values: unknown, loading, consent, legitimateInterest |
|
cmpLastStatus |
Last/previous cmp event status name. Possible values: unknown, loading, loaded, consent, legitimateInterest, disabled, hidden, visible, tcloaded, consent-loaded, useraction. |
|
cmpLoadingStatus |
Status name of the loading sequence (stub, loading, loaded, error) |
|
cmpDisplayStatus |
Status name of the display of the consent layer (visible, hidden, disabled) |
|
consentExists |
A consent status exists (true/false). Please note that this is true as soon as the consent layer is shown and/or in cases when no consent is required. |
|
userChoiceExists |
A consent status exists that is based on the users choice (true/false), e.g. the user clicked on accept, reject or saved the custom settings. |
The event cmpEvent in combination with above variables can then be used as a trigger for the tag manager in order to know if/when to fire the codes.
Integration via GTM Template
- Login to your Google Tag Manager and click on Tags > New > Tag Configuration
- From the Tag Type menu, choose Features Community CMP Templates > Consentmanager CMP
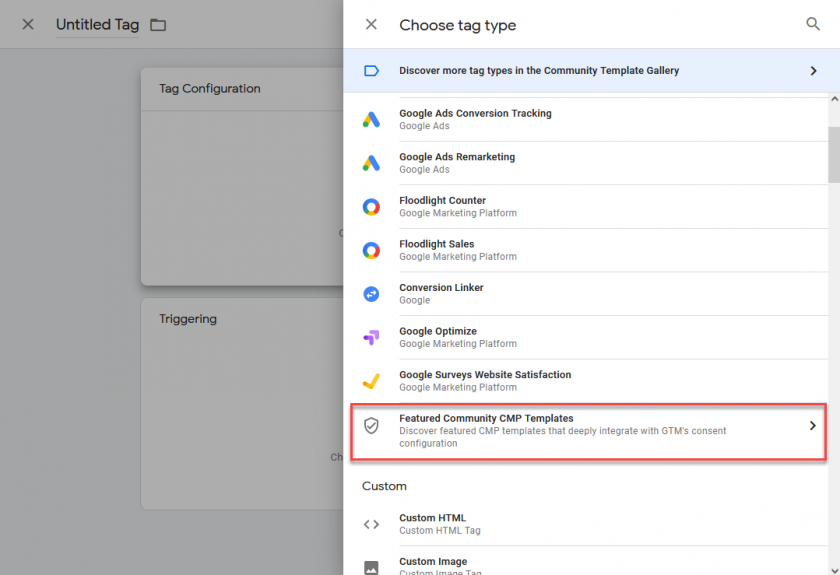
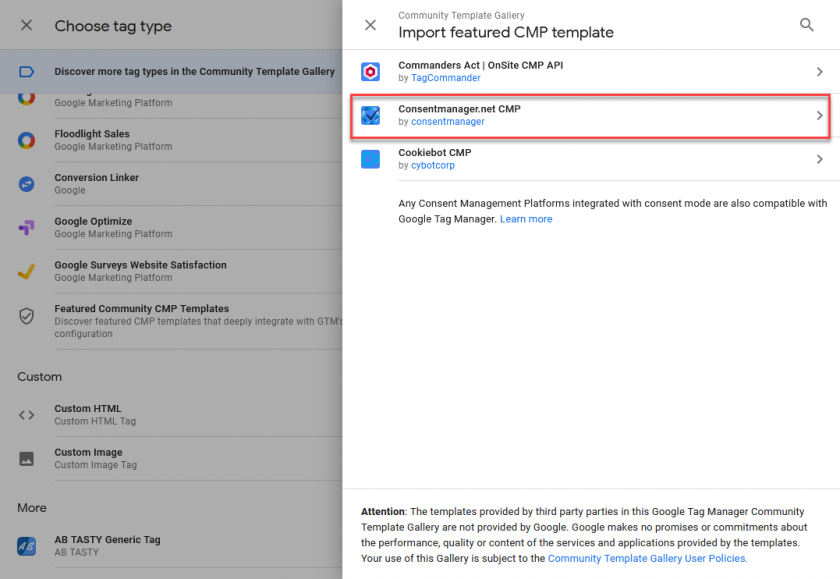
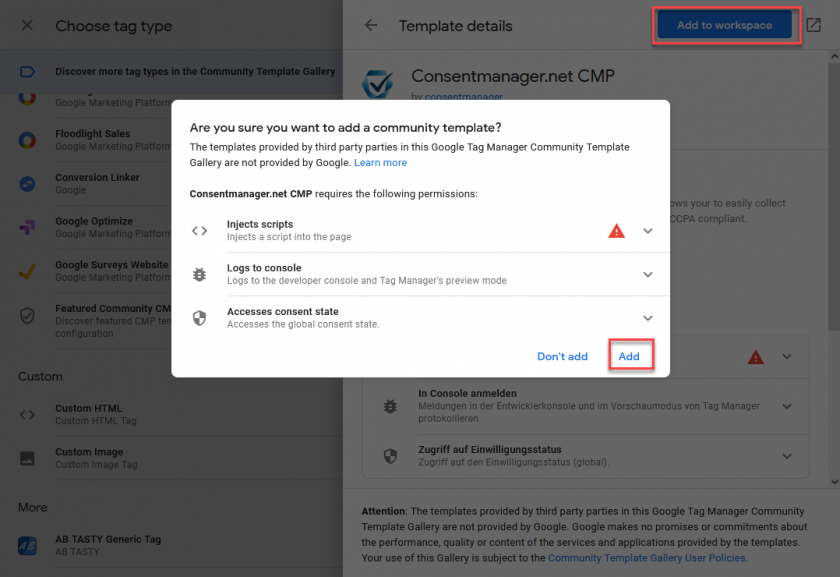
- Click on Add to Workspace > Add
- Get your CMP-ID, CDN and Host from your Account from Menu > CMPs > Get Codes for ... Websites
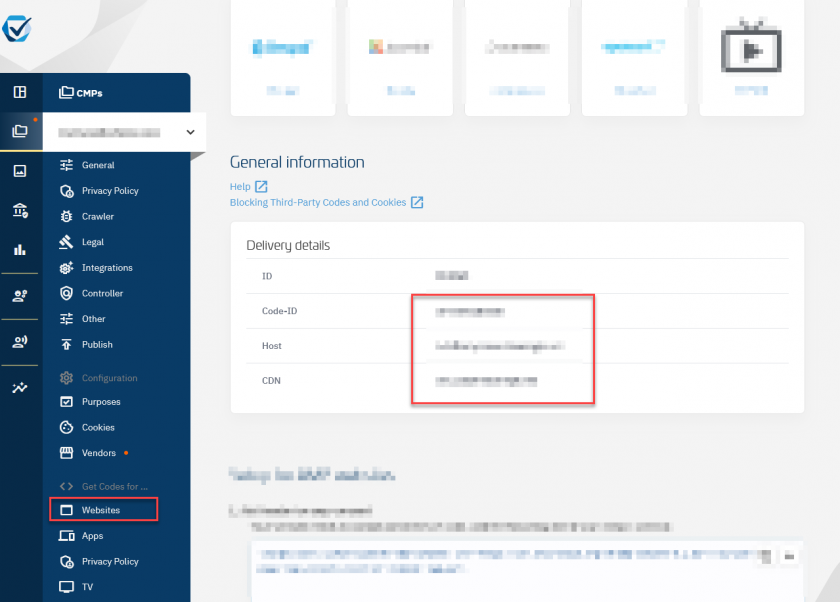
- Insert your CMP-ID, CDN and Host to our GTM Template and save.
Insert without the protocol "https://"!
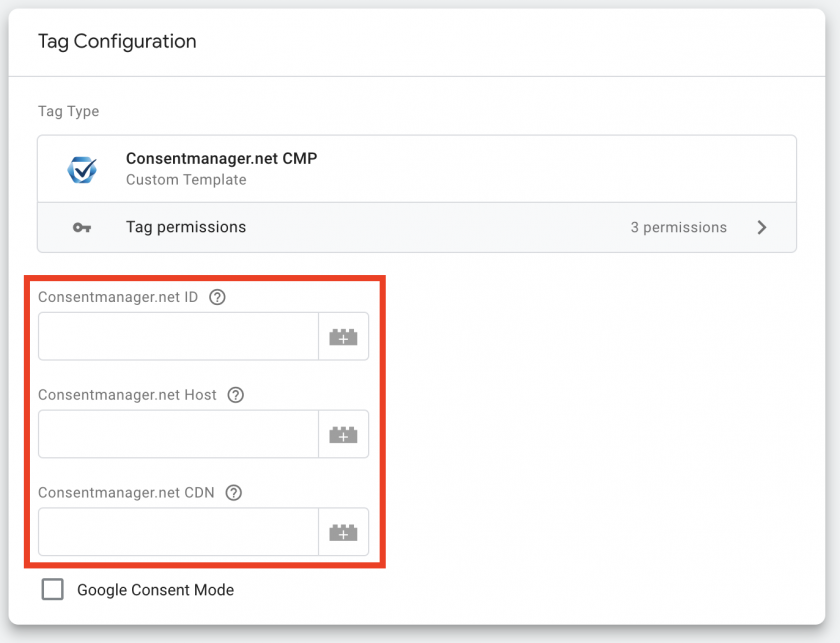
- Set the Tag with CMP-Code to trigger on every pageview:
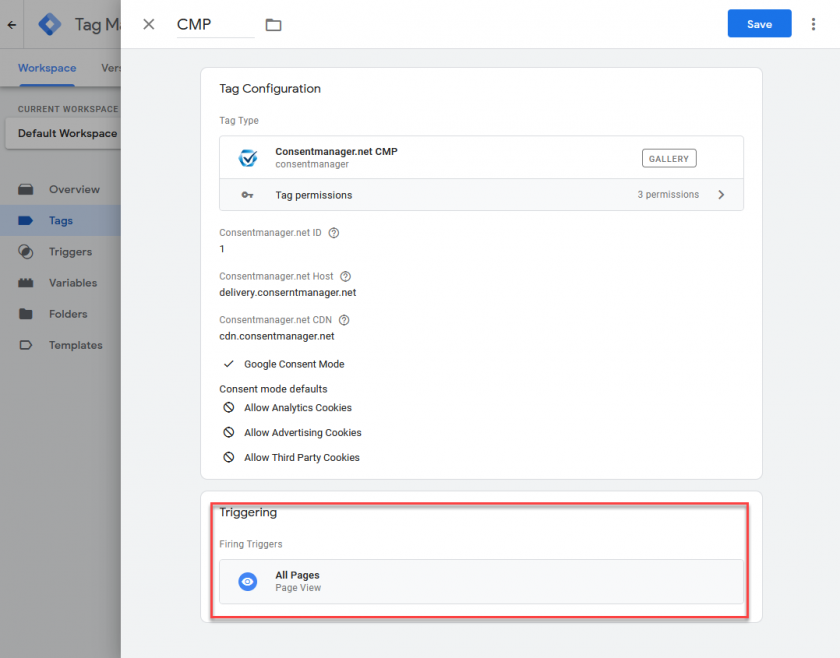
Please note: Due to Google guidelines, we have to initially enable Consent Mode. This can be confusing when customers integrate our template and e.g. do not see live Google Analytics numbers. If you do NOT want to use Consent Mode, please do not forget to deactivate the feature in the template.
Manual integration
If you do not want to use the GTM template or the GTM recipe (see above), you can insert the CMP code manually in yout TagManager. Therefore copy the semi-automatic / manual blocking code from Menu > CMPs > Get code for ... Website and paste it into your TagManager as a new tag. Set the tag to be fired with the earliest possible event (PageView or earlier). Do not set a condition / exclusion to the tag.
GTM + Google Consent Mode
In order to use consentmanager with GTM and Google Consent Mode, please see our dedicated help section on Google Consent Mode here.
Updating your tags & conditions
Note: If Google Consent Mode is enabled, you can use the build in consent variables in order to filter the tags. In most cases this is easier compared to updating trigger conditions. More Info on Google Consent Mode see here.
In order to display certain codes only if consent is given, please follow these steps:
- Create variables in GTM: In GTM go to Variables > New and click on configure:
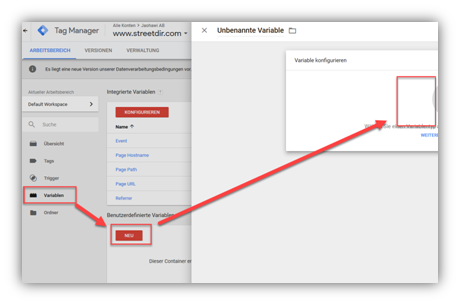
- Choose variable type Page Variables > Data Layer Variable, create the needed variables, usually you will need at least the variable
cmpConsentVendors. Add more variables from the table above if necessary: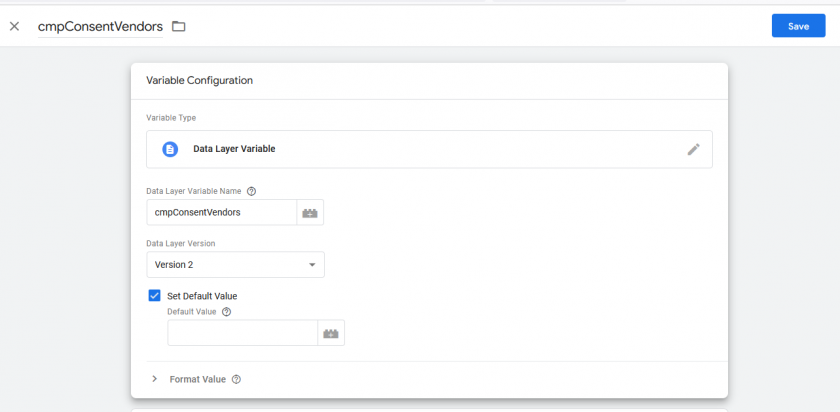
- Repeat the steps above for all other variables that you require (usually cmpGDPR, cmpConsentVendors, cmpConsentPurposes, ...)
- Go to Triggers > New and click on configure:
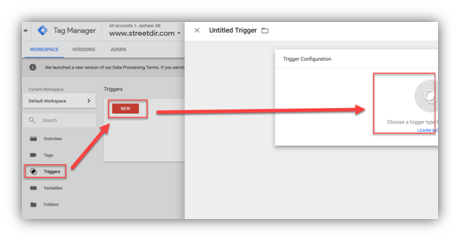
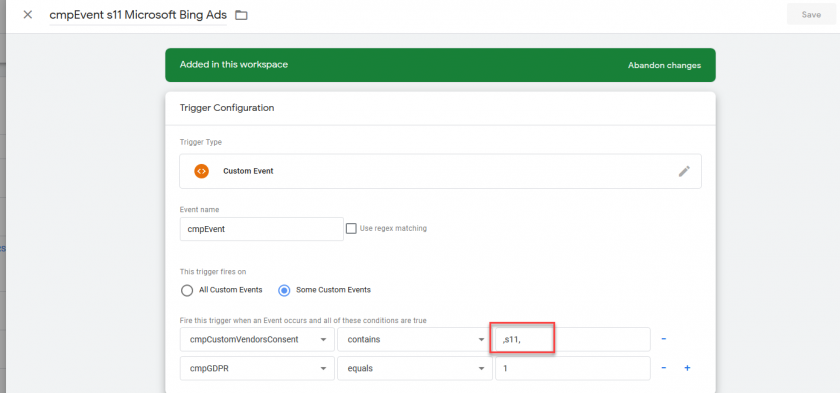
- Use event Name
cmpEventand add custom events to it: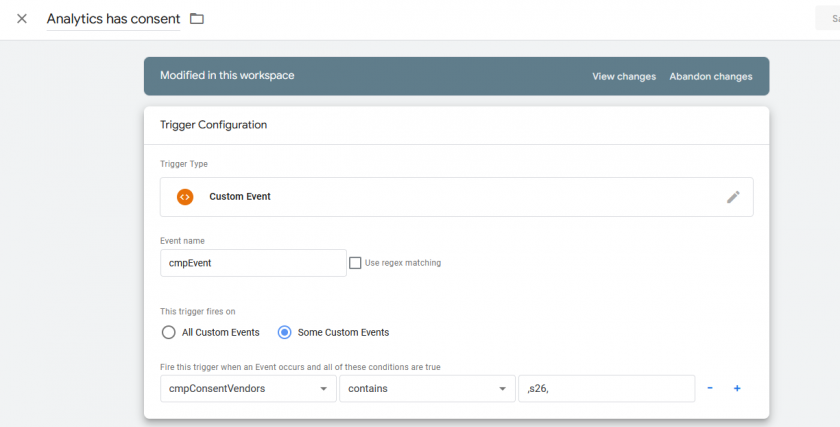
- For each event at least one rule is necessary:
cmpConsentVendors contains ...(orcmpConsentPurposes contains ...).
- Set the event rules to
cmpConsentVendors contains ,x,wherexis the ID of the vendor. The IDs for the vendors can be found under menu Vendors/Whitelist: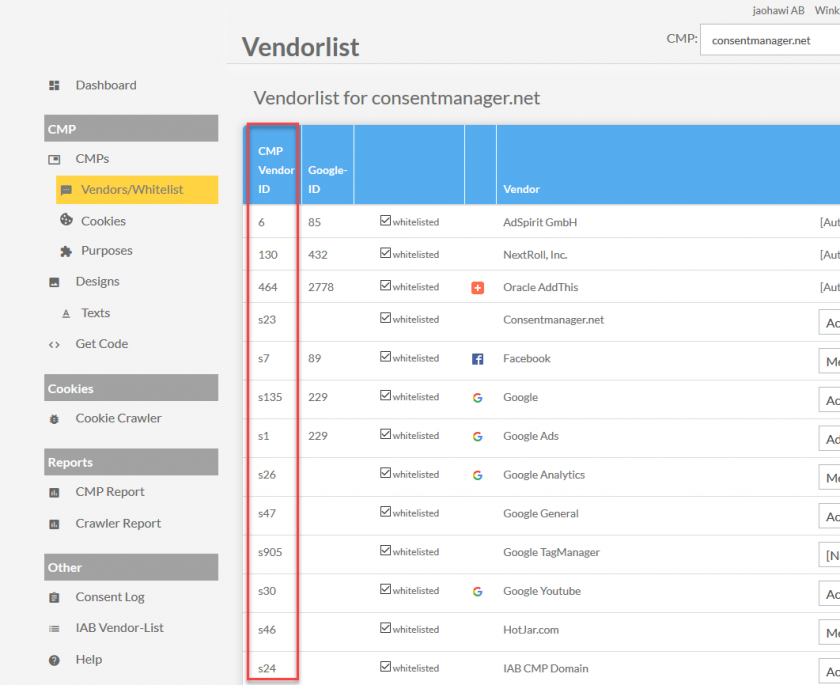
Important: Always only use one vendor per trigger (... contains ,x,and not... contains ,x,y,z,). If you are working with multiple vendors, create multiple trigger and one trigger per vendor.
Important: Please always use comma before and after the vendor ID (e.g.cmpConsentVendors contains ,x,and notcmpConsentVendors contains x) - Repeat the above step for each vendor and create a new trigger for each vendor

- Apply the trigger to your tags and ensure that the tags do not fire with pageView event but only with the cmpEvent:
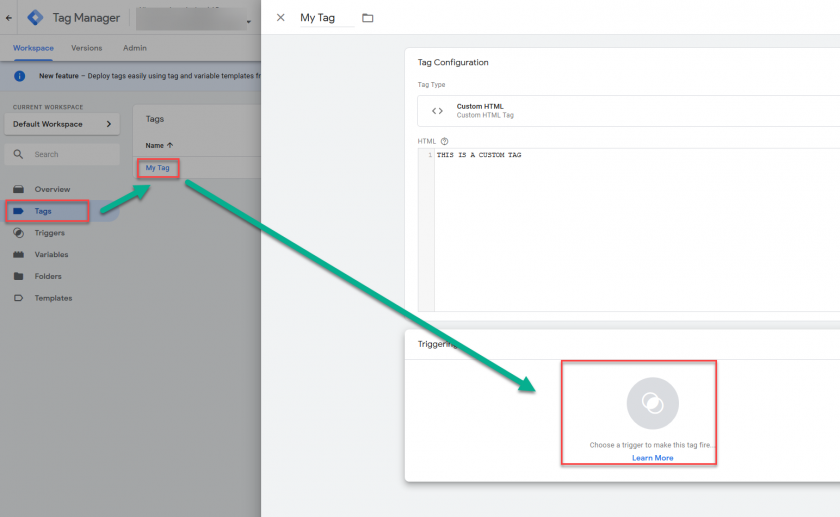
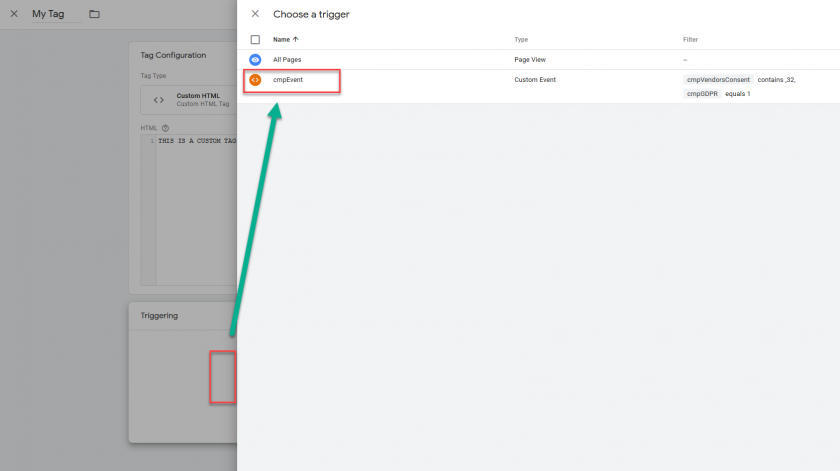
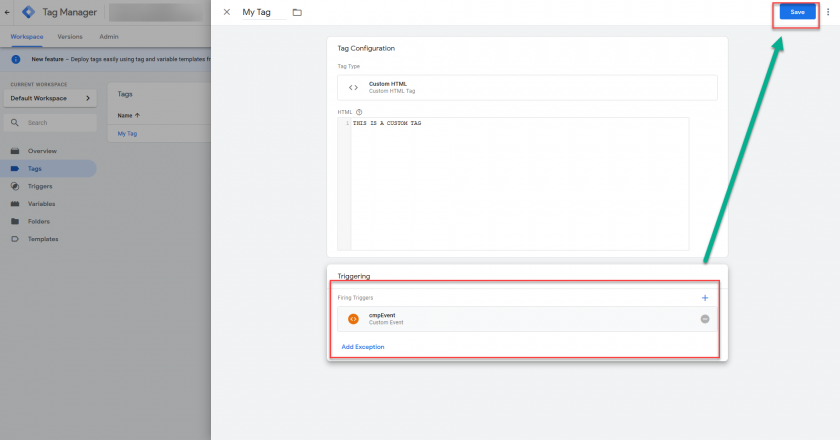
Example for Google Analytics: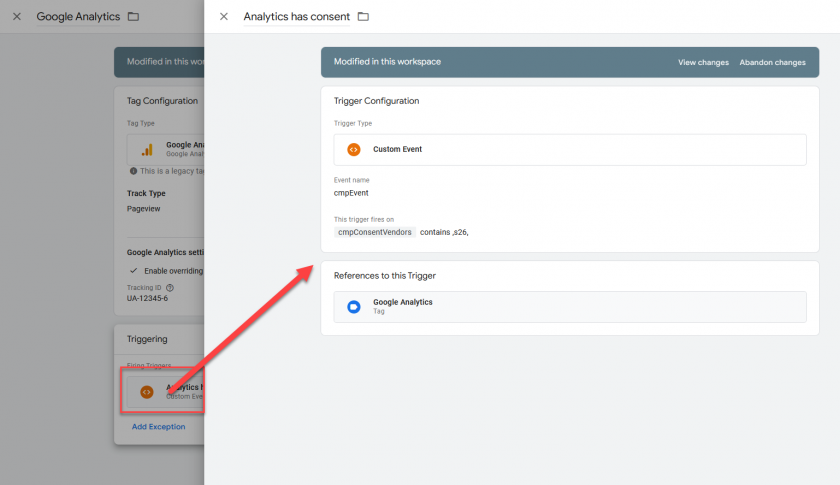
Important: Ensure that the trigger is the only trigger for each tag you are using. Do not combine triggers with other triggers/events like "All pages" or "On page load" and so on.
Example: Blocking Google Analytics with Google TagManager (GTM)
Here are some example screenshots how a setup would look like in order to block Google Analytics if no consent is given.
Trigger
Trigger Google Analytics on all pages when consent is given:
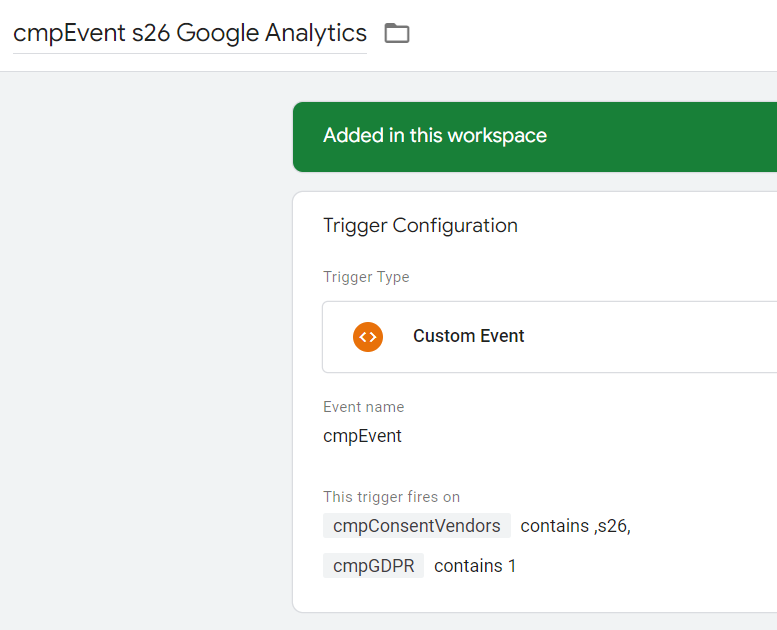
Tag
Google Analytics Tag with assigned Triggers (second trigger is optional):
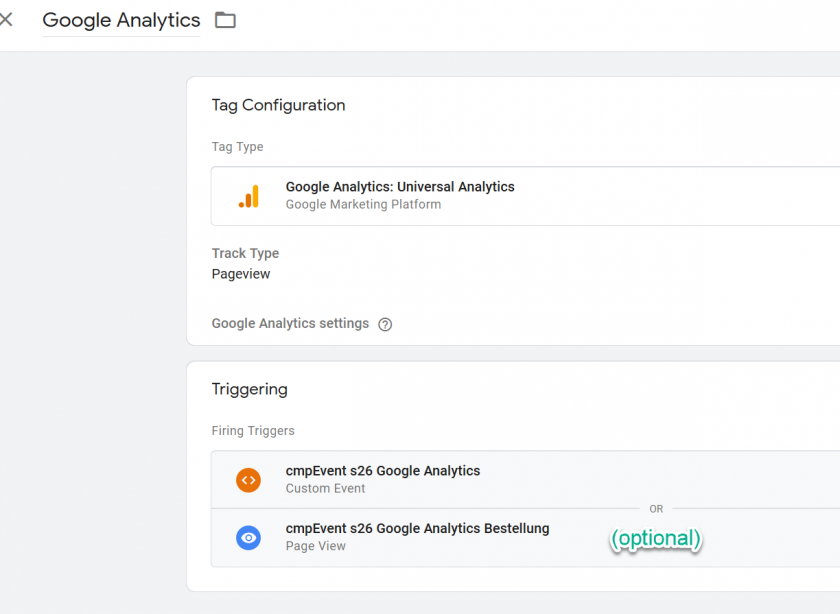
How to block the Google TagManager Code if no consent is given?
Please note: If you do not want to block GTM itself but only the tags that are fired by GTM and when using automatic blocking, please ensure that the TagManager is prevented from being blocked by inserting the attribute data-cmp-ab="1" into the TagManager code.
If you not only want to block the codes within the TagManager but also the TagManager itself, you can do so by following these steps:
Your GTM code will look somehow like this:
<script>(function(w,d,s,l,i){w[l]=w[l]||[];w[l].push({'gtm.start':
        new Date().getTime(),event:'gtm.js'});var f=d.getElementsByTagName(s)[0],
        j=d.createElement(s),dl=l!='dataLayer'?'&l='+l:'';j.async=true;j.src=
        'https://www.googletagmanager.com/gtm.js?id='+i+dl;f.parentNode.insertBefore(j,f);
    })(window,document,'script','dataLayer','GTM-ABCDEF');</script>
In order to allow the consentmanager.net CMP to block and only enable the code on consent you will need to change the code in the following way: (see changes in <script ...> part of the code)
<script data-cmp-vendor="s905" type="text/plain" class="cmplazyload" >(function(w,d,s,l,i){w[l]=w[l]||[];w[l].push({'gtm.start':
        new Date().getTime(),event:'gtm.js'});var f=d.getElementsByTagName(s)[0],
        j=d.createElement(s),dl=l!='dataLayer'?'&l='+l:'';j.async=true;j.src=
        'https://www.googletagmanager.com/gtm.js?id='+i+dl;f.parentNode.insertBefore(j,f);
    })(window,document,'script','dataLayer','GTM-ABCDEF');</script>
Please note that the automatic blocking code may prevent the browser from executing the GTM code but may not be able to stop the browser from downloading the GTM source codes. Therefore it can be that the crawler will alert you that GTM is loaded without consent. If you want to be sure that GTM is not loaded without consent, you MUST change the GTM code as described above.
How to prevent Google TagManager to fire multiple times?
The CMP will fire the cmpEvent datalayer every time when the consent information is refreshed. This occurs when the page is loaded and consent information is found in the visitors cookie, when the consent layer is displayed and the visitor makes a choice or when the visitor resurfaces the consent layer and changes the settings. In the last case it can occur that the visitor opens and closes the consent layer several times. Each time the layer closes, the datalayer will be fired and the Google TagManager might show some tags or fire Google Analytics counting. In order to prevent tags from being fired multiple times on a page, please follow these steps:
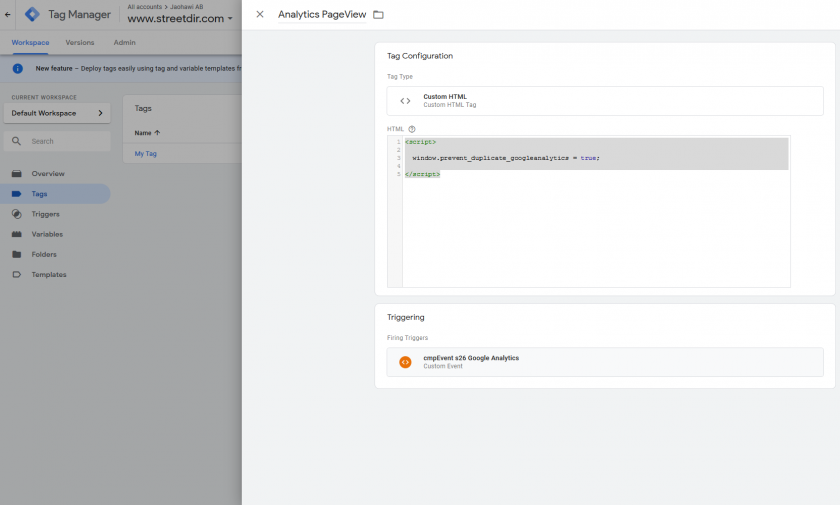
- Create a new tag for each tag that you want to prevent from being fired again. Use a custom HTML code and insert the following code:
<script> window.prevent_duplicate_googleanalytics = true; </script> - Use the same trigger for this new tag as you use for the original tag.
- Create a new variable of type custom javascript and use the following code:
function (){ return ("prevent_duplicate_googleanalytics" in window); }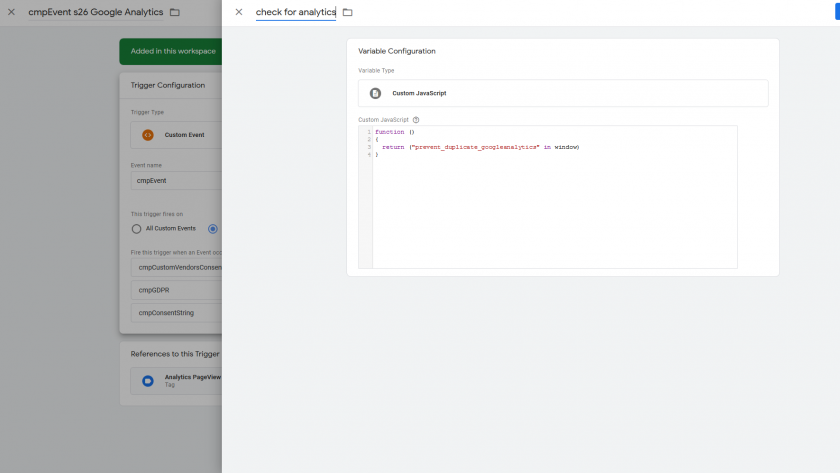
- Add another condition to your existing trigger using the variable you created before ("Variable XXX equals false"):
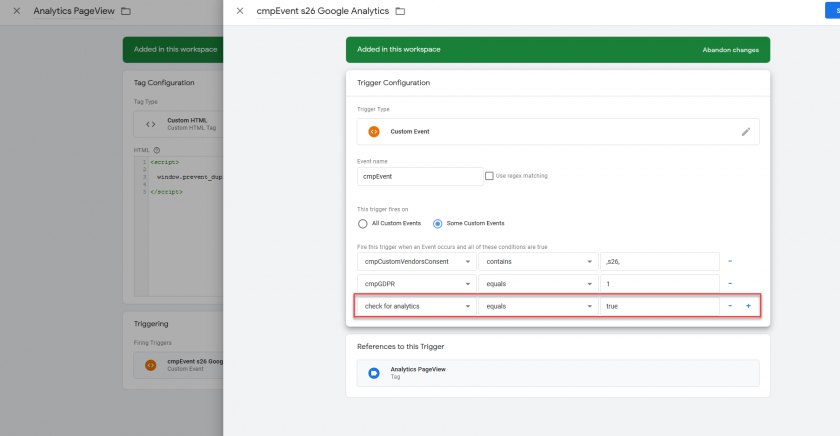
How to handle dataLayer or event order?
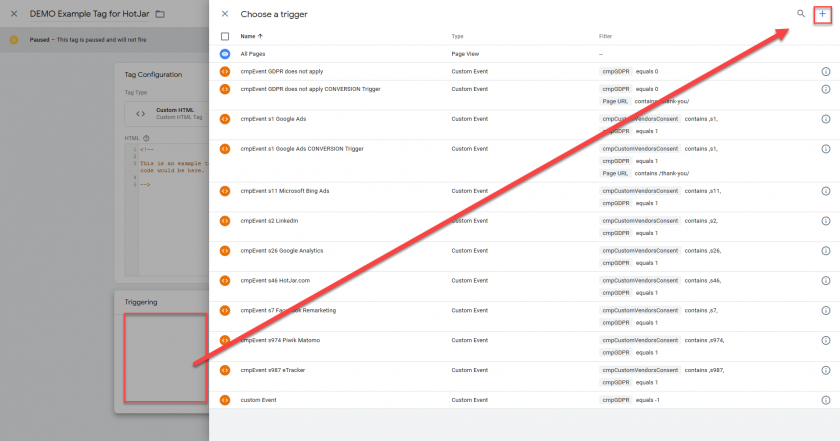
- Edit the tag and remove the exitsing trigger from it.
- Click on the icon to assign a new trigger to the tag and then create a new trigger:
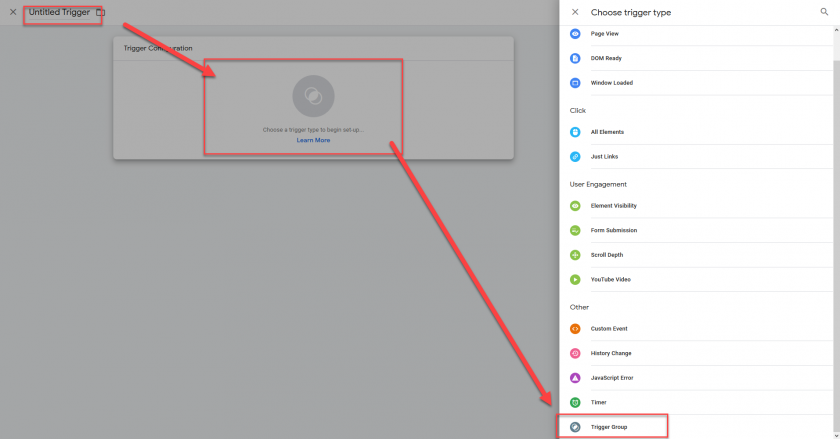
- Give the new trigger a name and choose trigger type "Trigger Group":
- Add your existing trigger and the cmpEvent trigger to the trigger group:
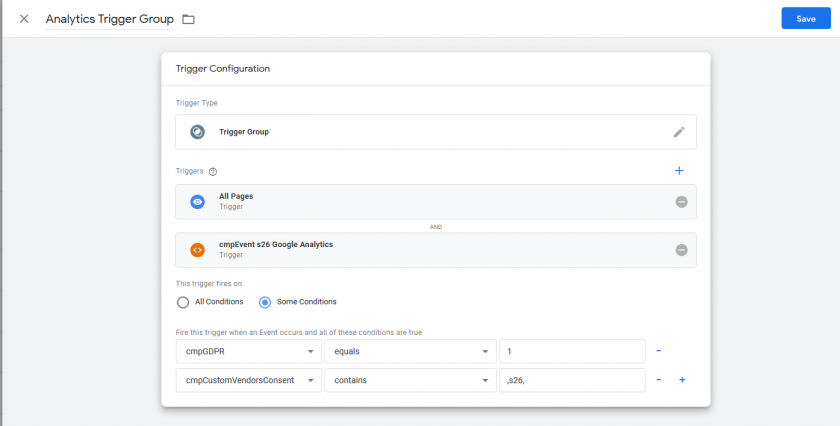
- Set the trigger conditions in the same way you do with normal triggers (e.g. add
cmpGDPR equals 1as a condition). - Save the trigger group and assign it to the tag.
Pausing / postponing dataLayer events until consent is given: The dataLayer Blocker
The dataLayer Blocker will pause all events that are sent to GTM until a user choice is given.
If an event occures, the dataLayer Blocker automatically will store this event in an internal storage and not pass it further to GTM. This allows the system to ensure the events are coming in the right order (e.g. consent events before PageView or eCommerce events). When the user made their choice (e.g. accepted or rejected), the dataLayer Blocker will automatically pass all stored events to GTM in order to allow GTM to start processing them.
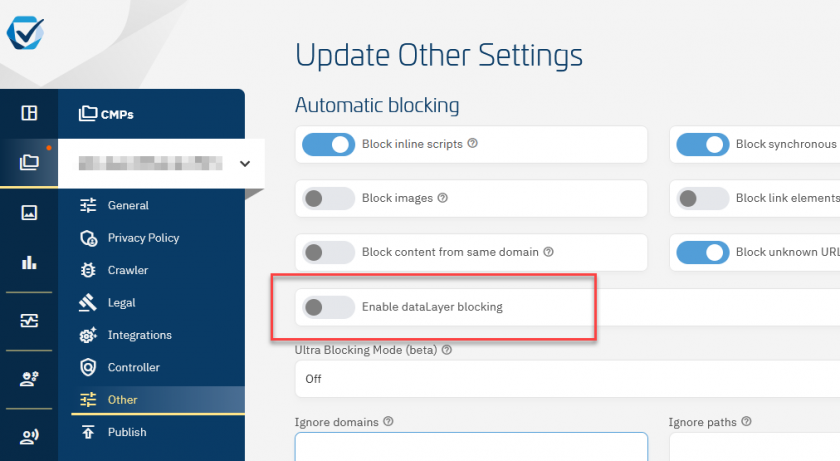
In order to enable the dataLayer Blocker please navigate to Menu > CMPs > Other Settings and enable Enable dataLayer blocking.
dataLayer Blocker + Automatic Blocking Codes
If you are using the Automatic Blocking Codes, you can enable the dataLayer Blocker as described. No further steps are needed.
dataLayer Blocker + Semi-Automatic Blocking Codes (Manual Blocking Codes)
If you are using the Semi-Automatic Codes (also known as Manual Blocking Codes), you need to enable the dataLayer Blocker as described above and add the following code to your website:
<script type="application/javascript" src="https://cdn.consentmanager.net/delivery/js/datalayerblocker.min.js"></script>Add the above code before any other third party code in the website <head>. Do not change the above code and do not attempt to load the code asynchronously or deferred.
Additional configuration
The following client side configuration variables can be used to influence the behavior of the dataLayer Blocker:
<script>
 window.cmp_datalayername = "dataLayer2";
 // Set before the code load to change the name of the dataLayer variable

 window.cmp_datalayerprotectoverride = true;
 // Set before the code load to enable override protection (dataLayer variable cannot be reset by other codes)

 window.cmp_datalayerallowlist = ['event:abc','myname:*'];
 // Set before the code load to expend allowList of events that get passed through before user choise is made

</script>
In addition you can call the website URL with ...?cmpnodatalayerblocker or ...#cmpnodatalayerblocker to temporarily disable the dataLayer Blocker function (e.g. during testing).
Webinar/tutorial about GTM implementation
Please note: Currently we can only offer this tutorial video in german. The GTM setup starts about minute 05:00 - 22:00. If you do not use Google Consent Mode you can skip the rest of the video.


